<?xml version="1.0" encoding="utf-8"?>
<feed xmlns="http://www.w3.org/2005/Atom">
  <author>
    <name>金融老民工</name>
  </author>
  <generator uri="https://hexo.io/">Hexo</generator>
  <id>https://laomingong.com/</id>
  <link href="https://laomingong.com/" rel="alternate"/>
  <link href="https://laomingong.com/atom.xml" rel="self"/>
  <rights>All rights reserved 2026, 金融老民工</rights>
  <subtitle>数字生活与技术指南</subtitle>
  <title>LaoMinGong</title>
  <updated>2026-07-23T11:58:07.933Z</updated>
  <entry>
    <author>
      <name>金融老民工</name>
    </author>
    <category term="实用工具与AI" scheme="https://laomingong.com/categories/%E5%AE%9E%E7%94%A8%E5%B7%A5%E5%85%B7%E4%B8%8EAI/"/>
    <category term="Hexo" scheme="https://laomingong.com/tags/Hexo/"/>
    <category term="免费软件" scheme="https://laomingong.com/tags/%E5%85%8D%E8%B4%B9%E8%BD%AF%E4%BB%B6/"/>
    <category term="GitHub项目" scheme="https://laomingong.com/tags/GitHub%E9%A1%B9%E7%9B%AE/"/>
    <category term="Cloudflare" scheme="https://laomingong.com/tags/Cloudflare/"/>
    <content>
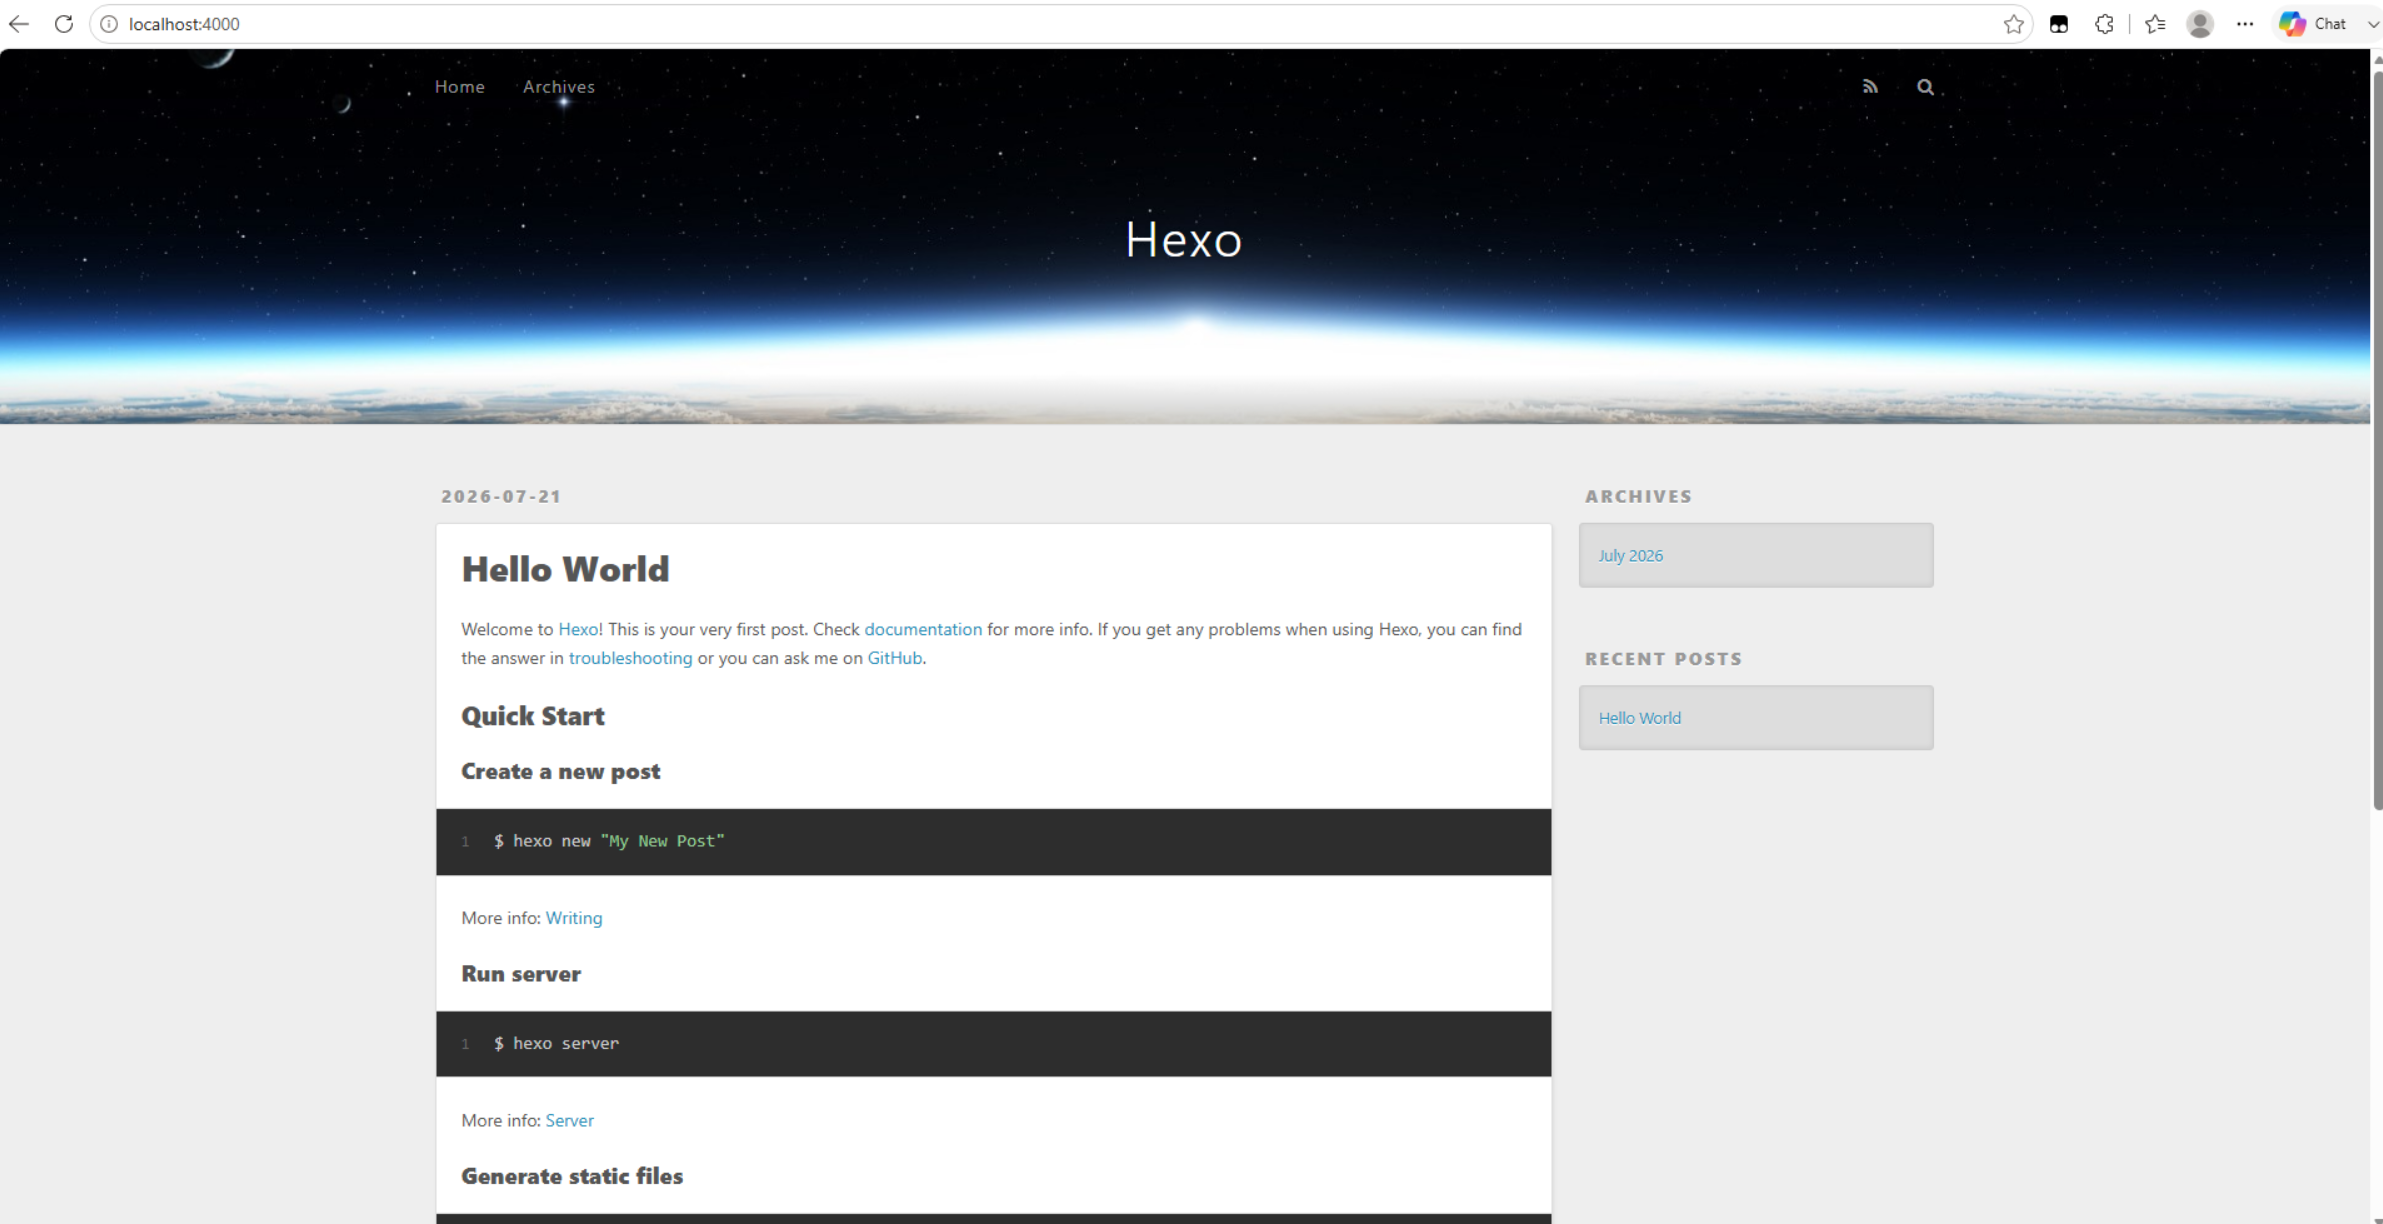
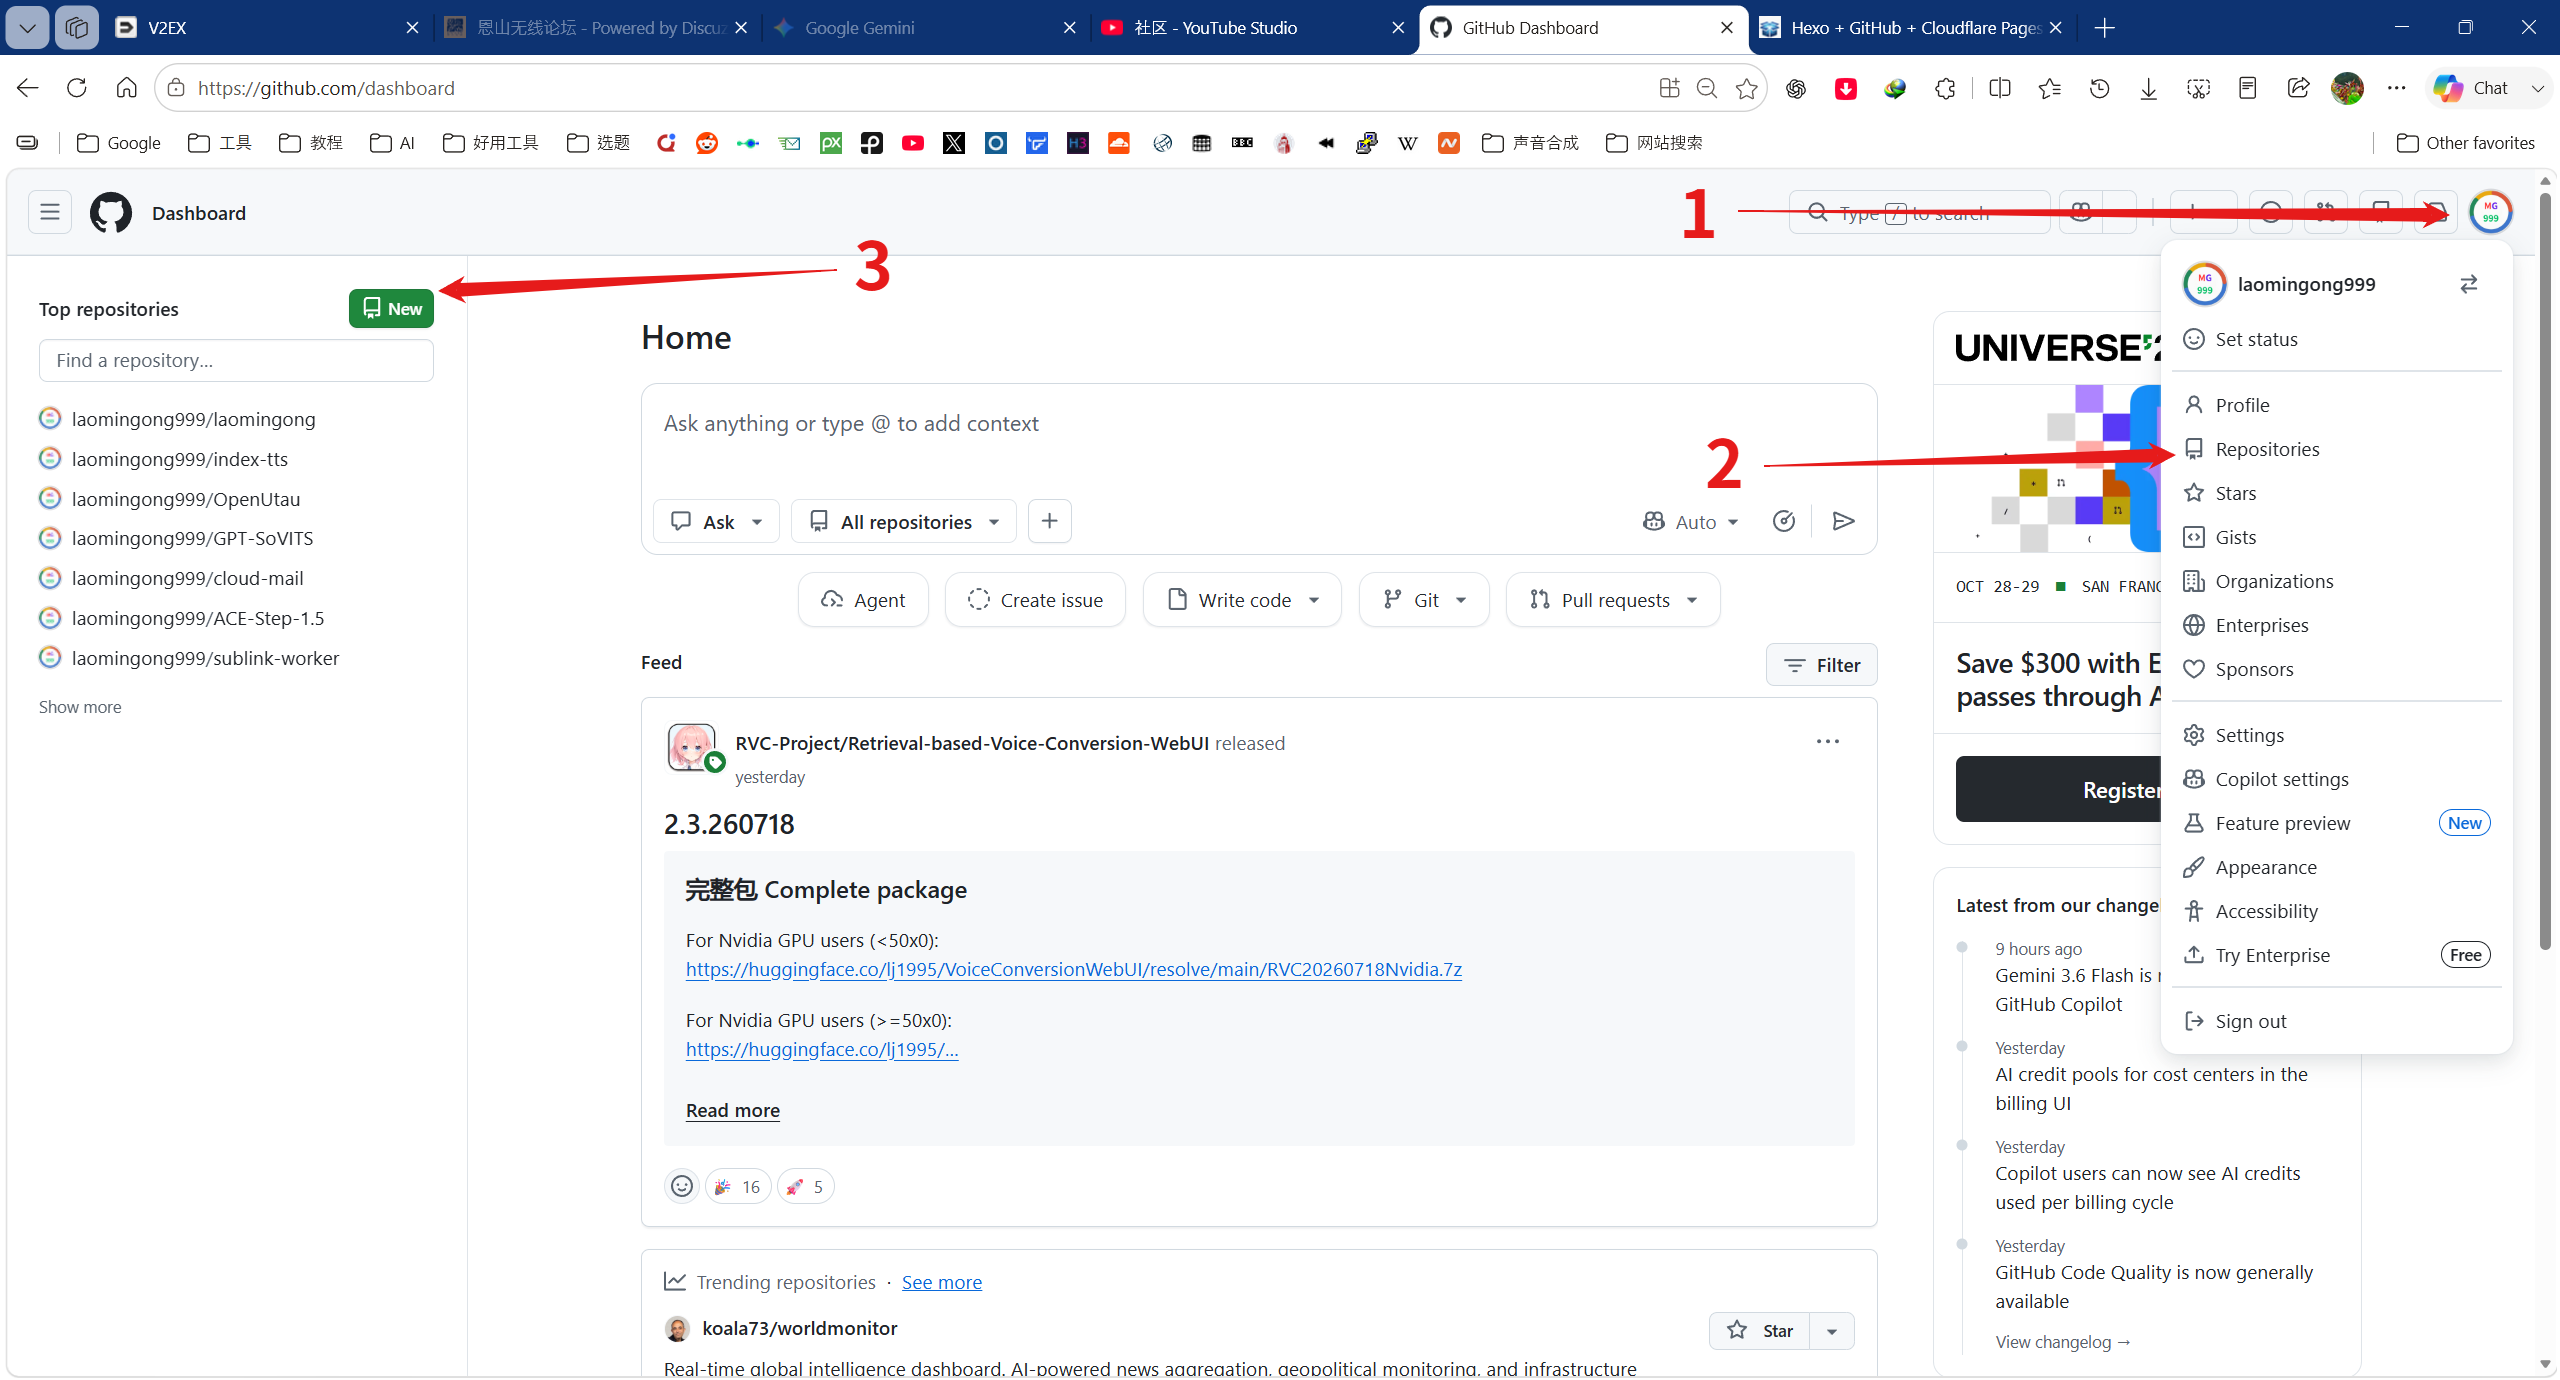
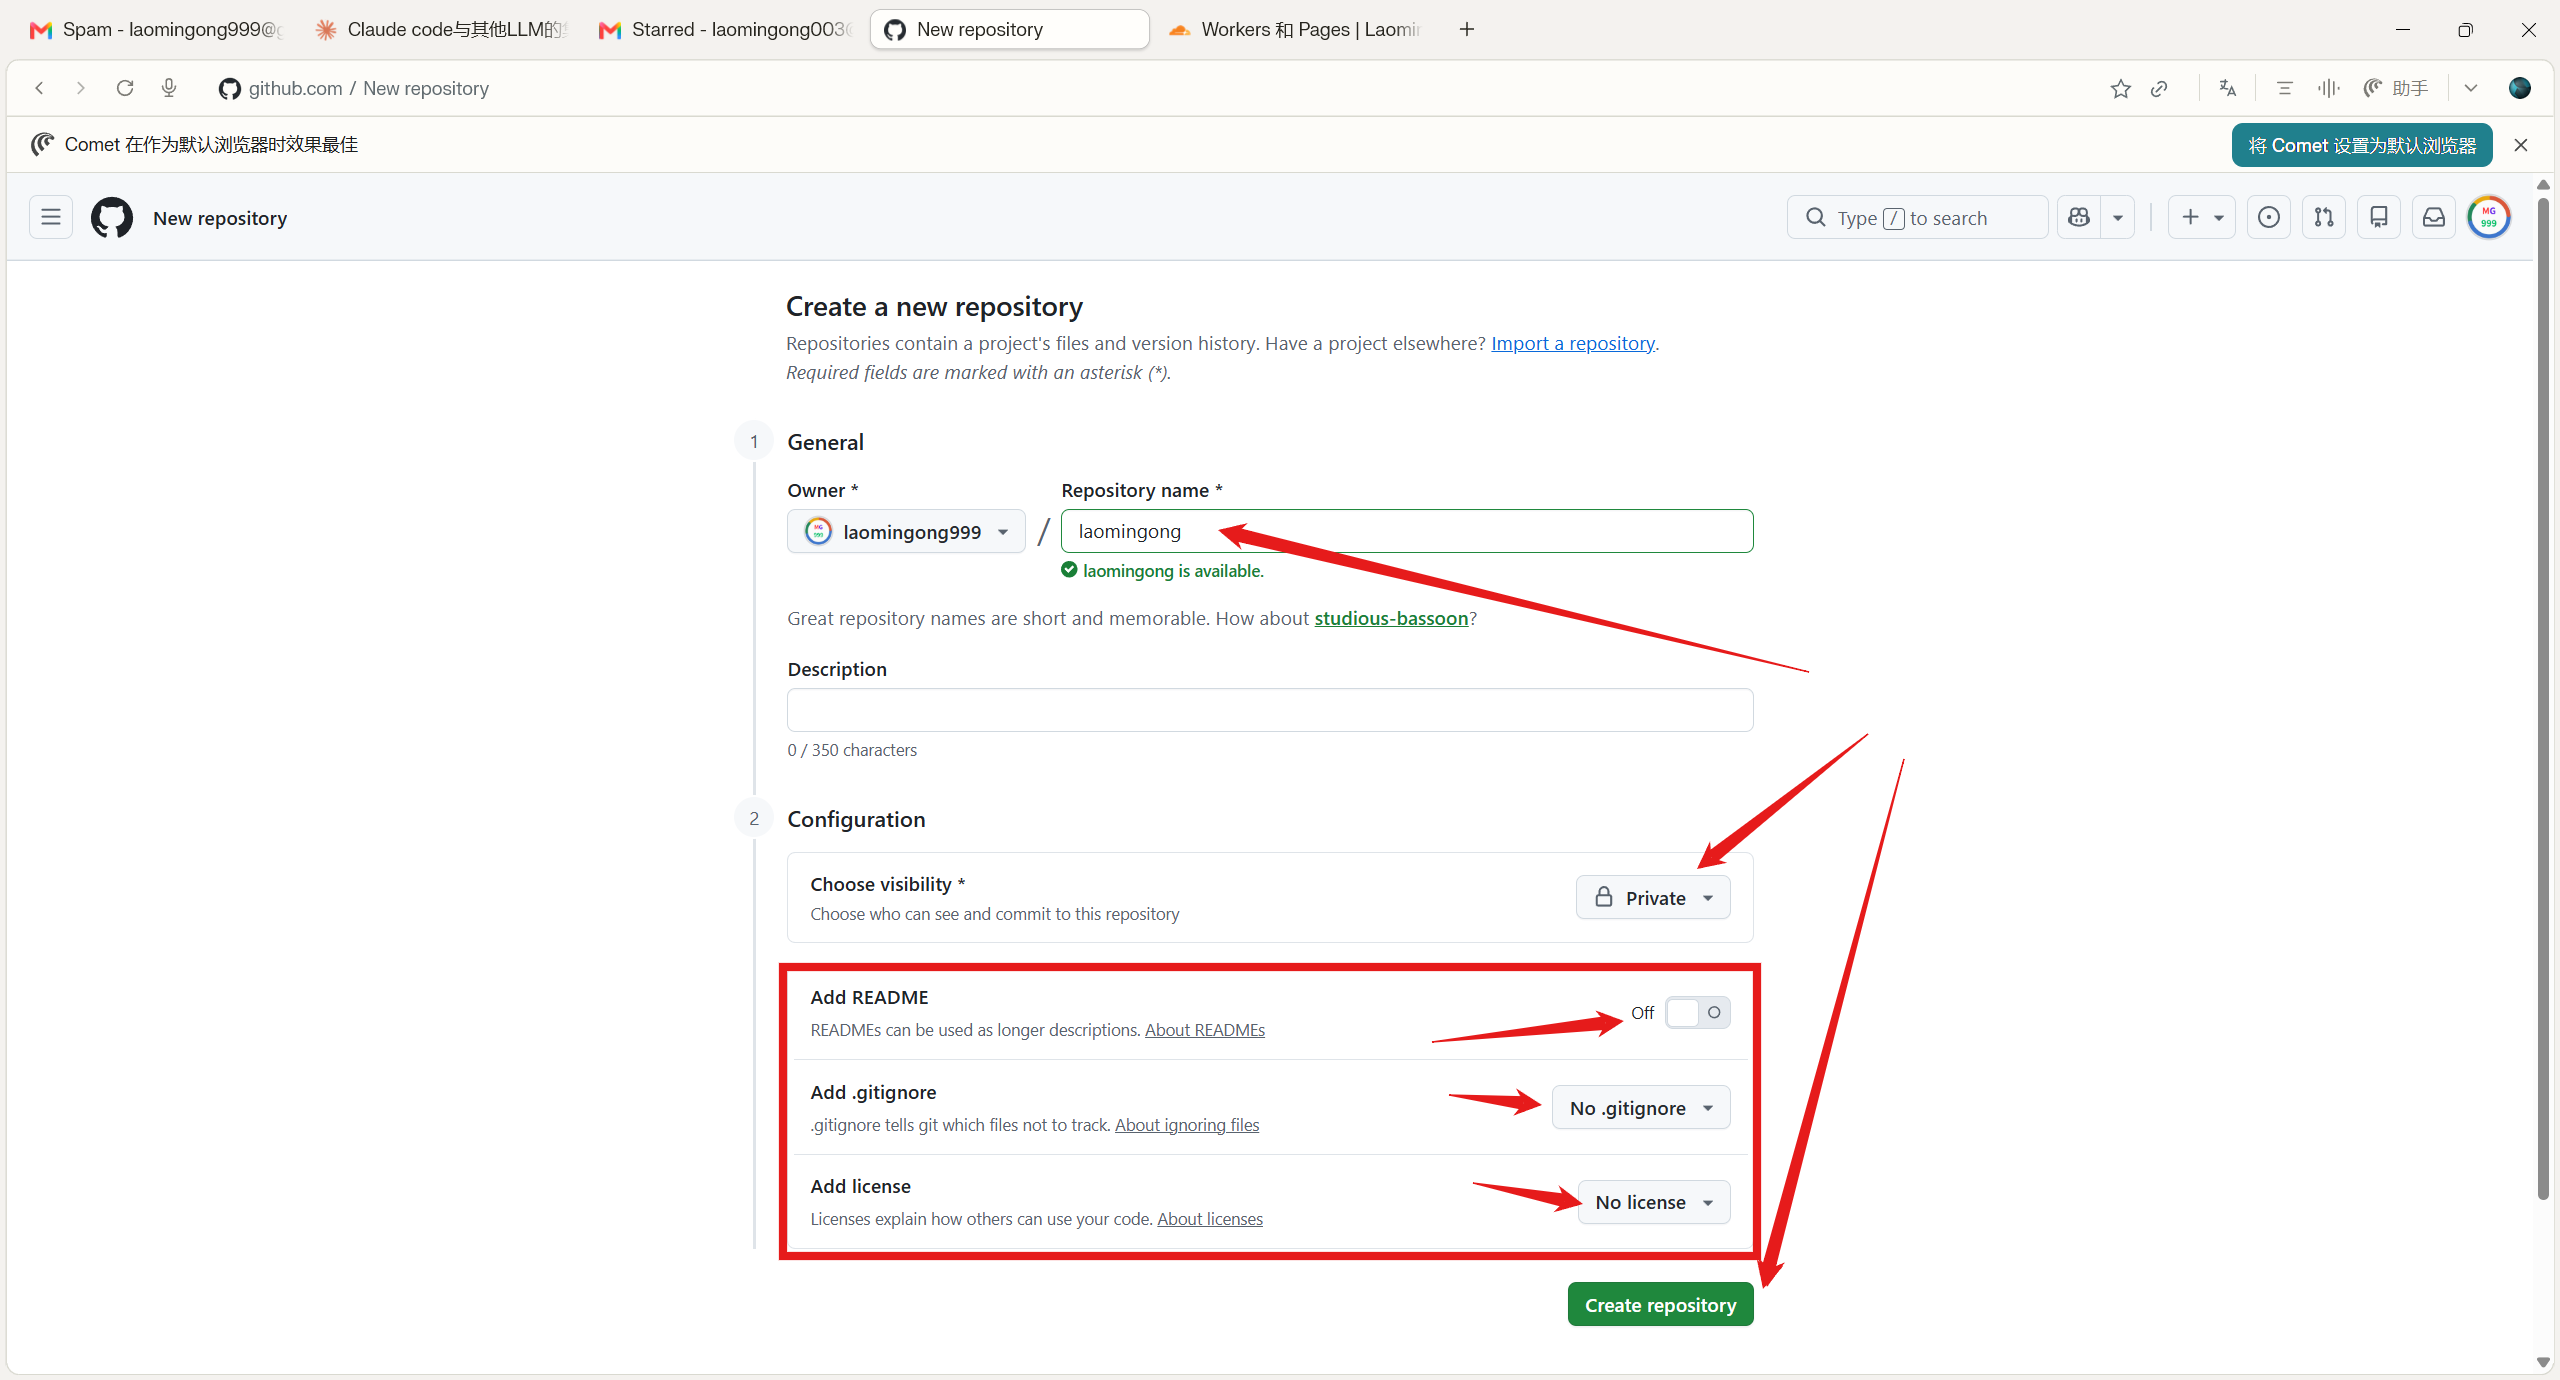
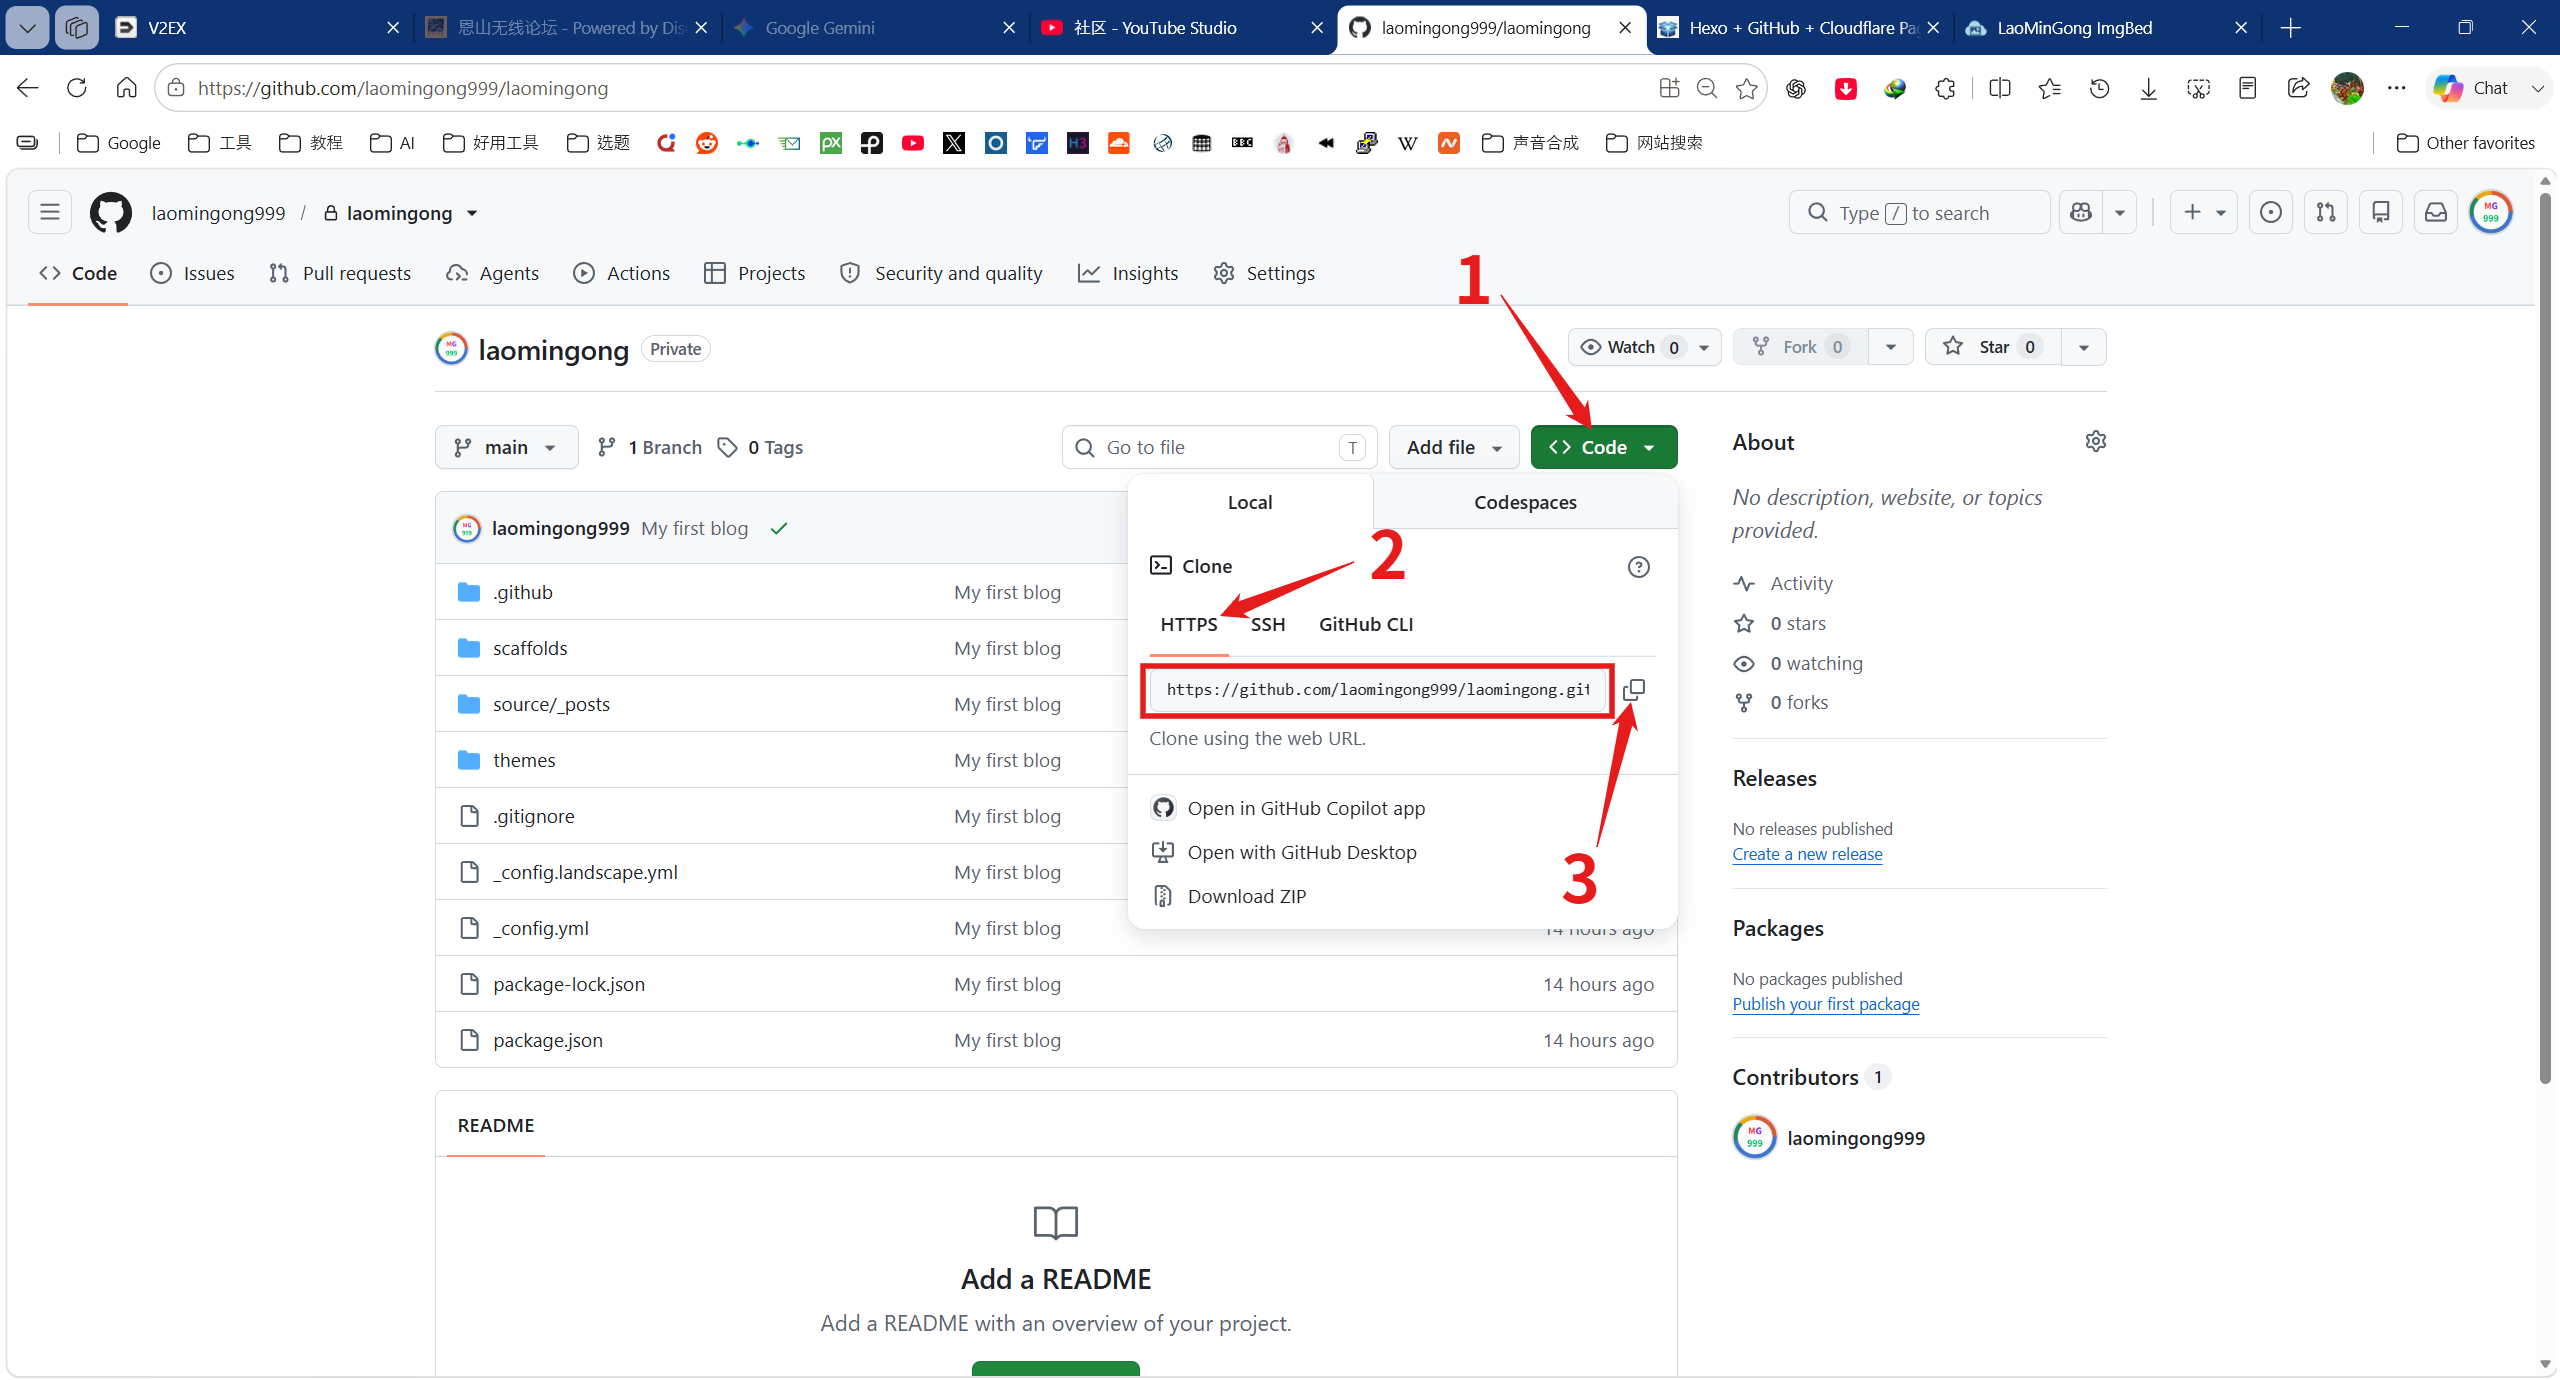
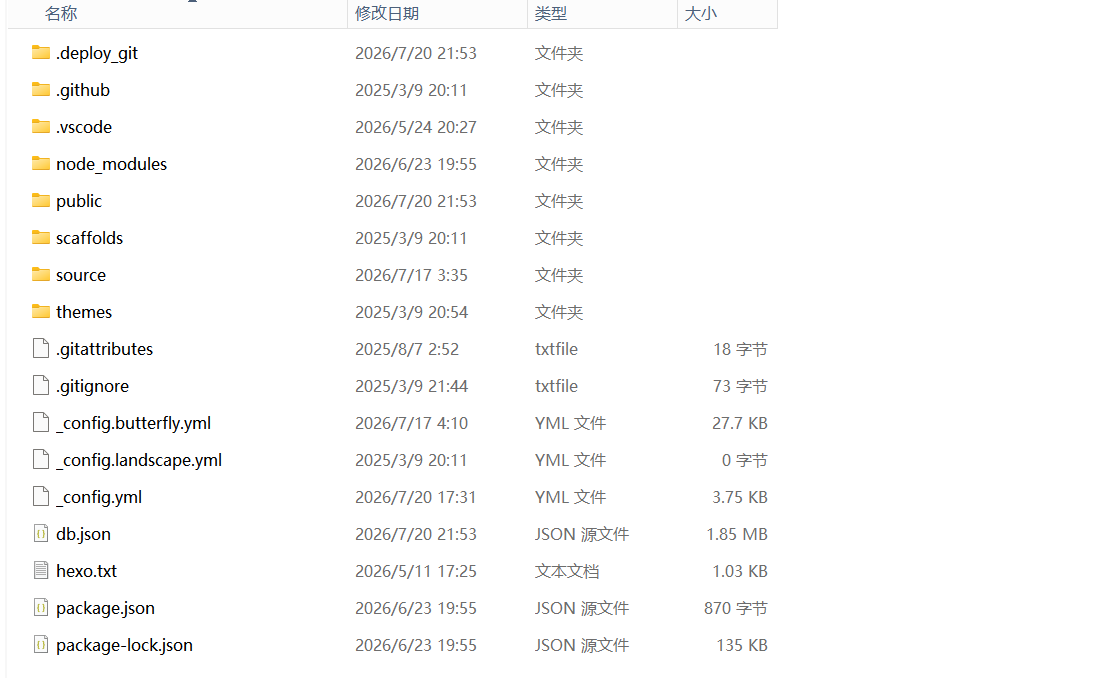
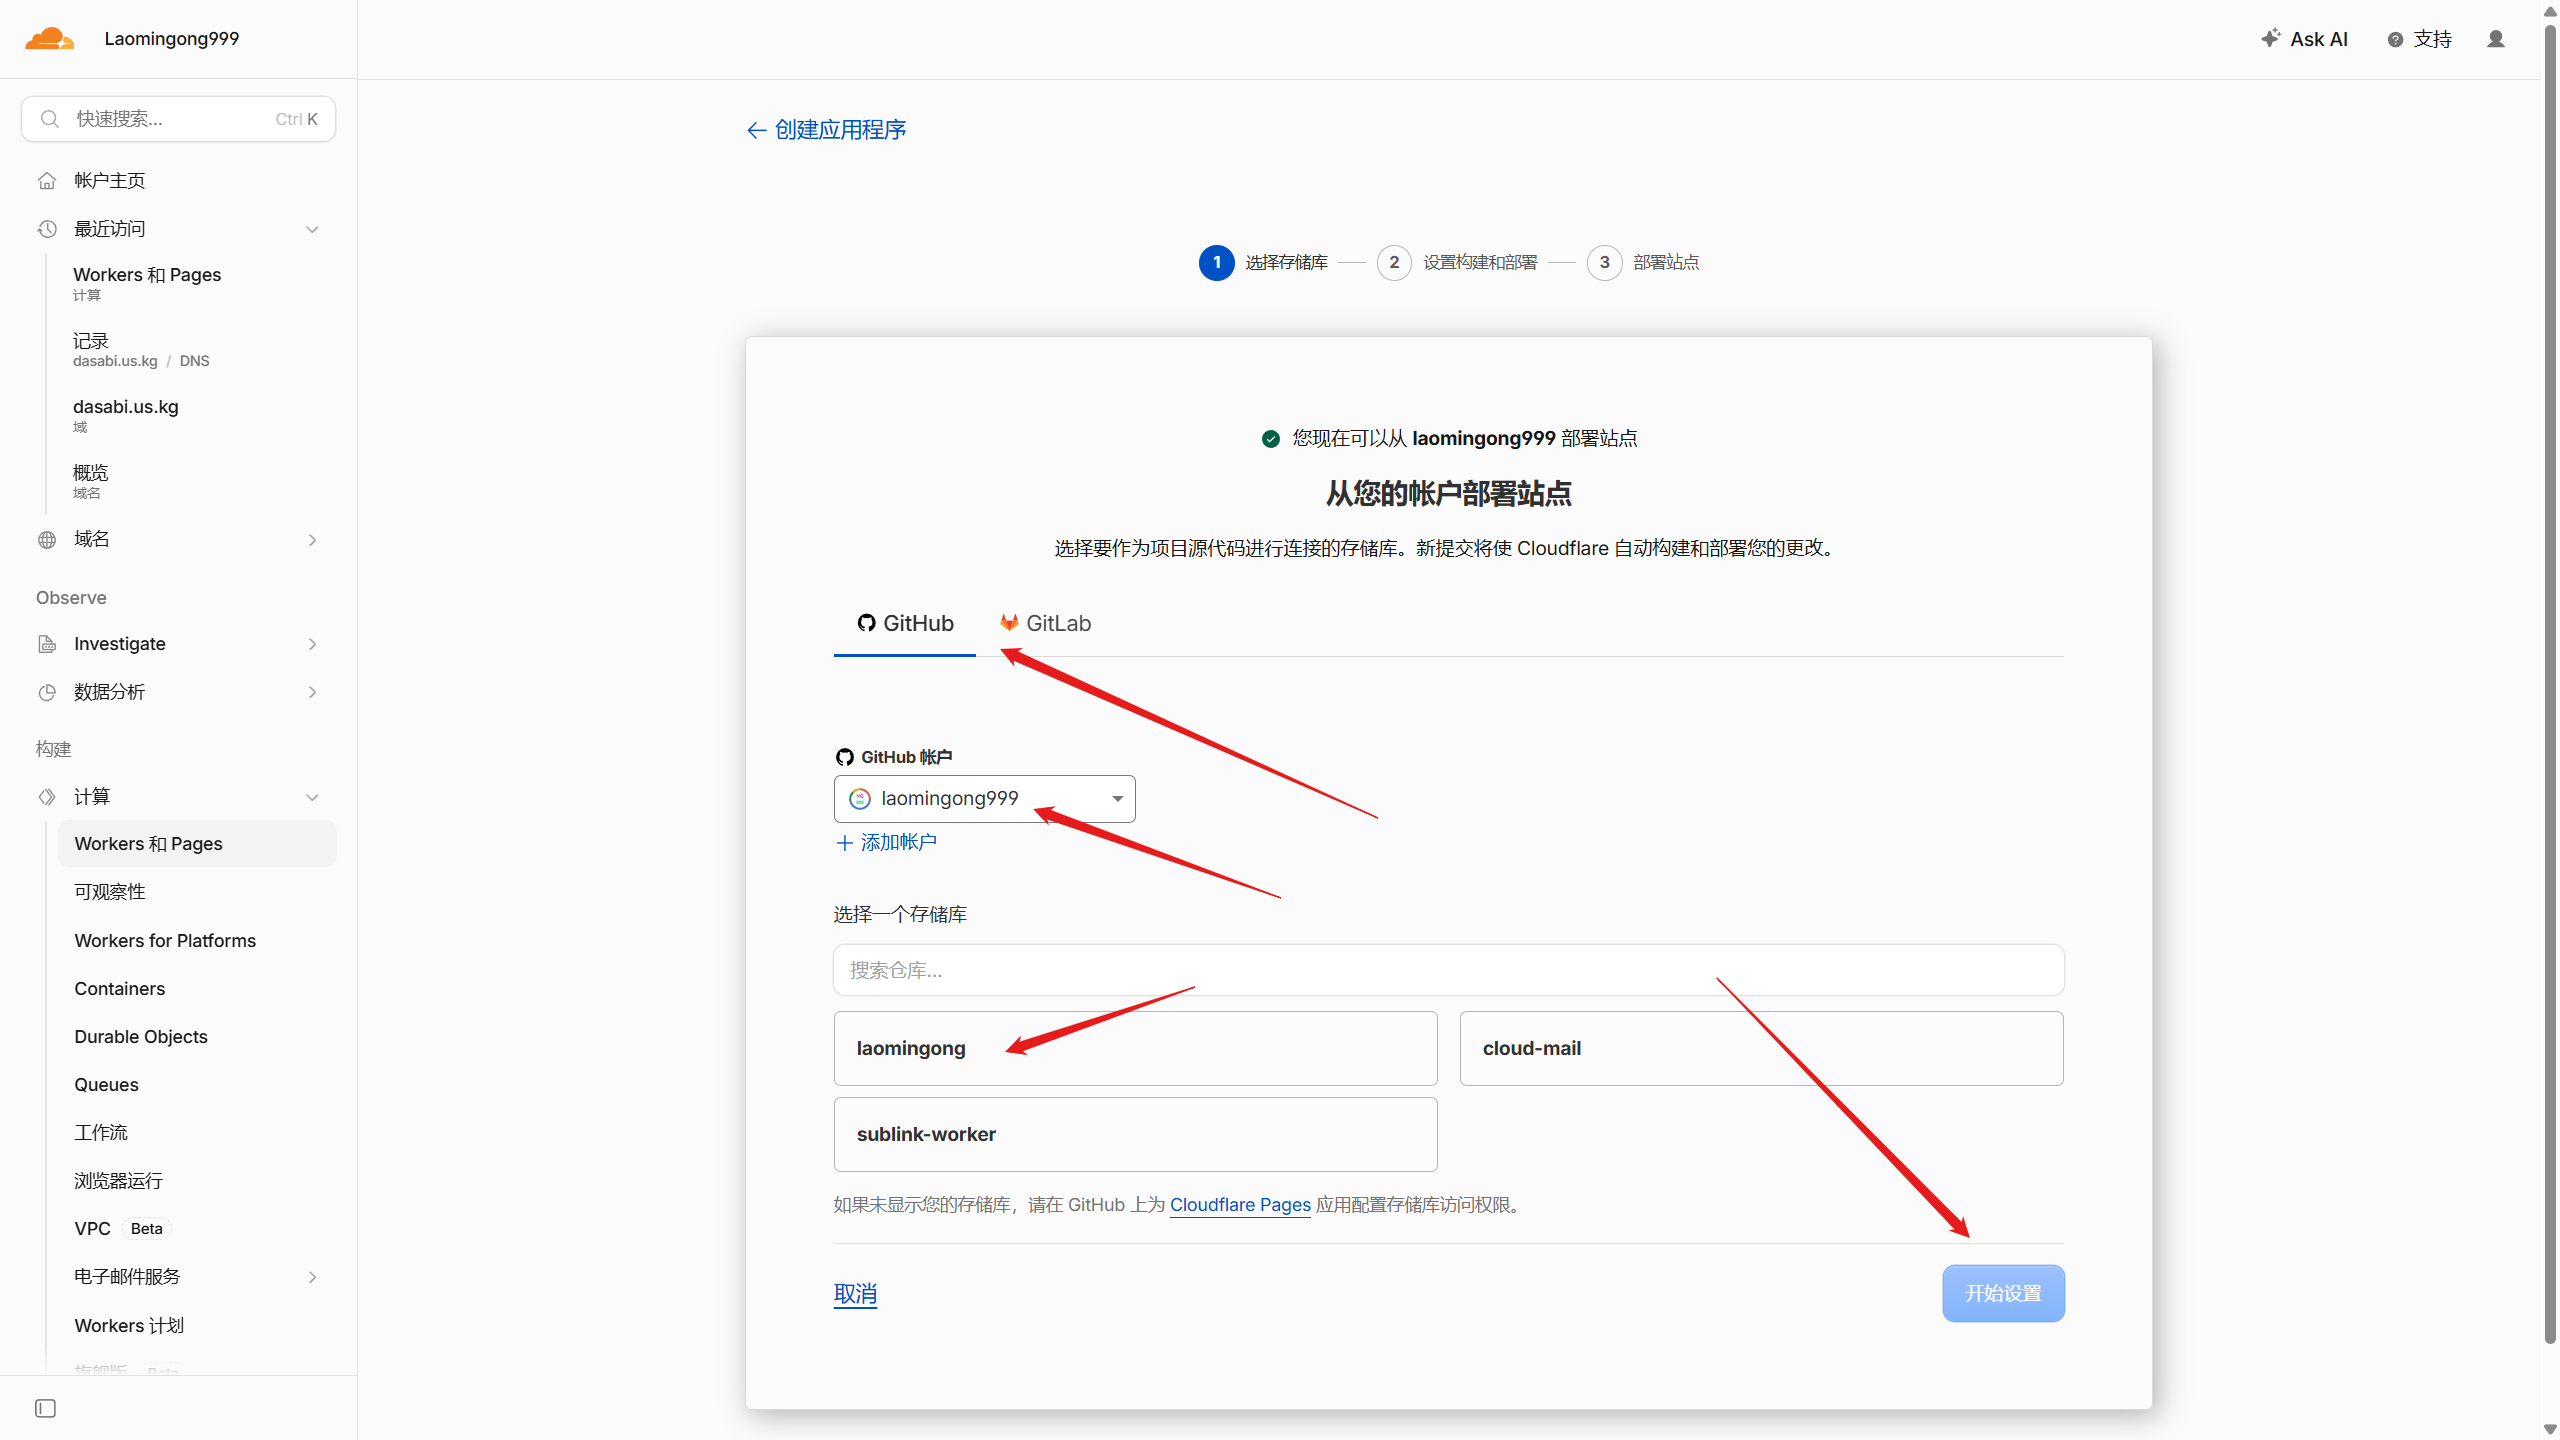
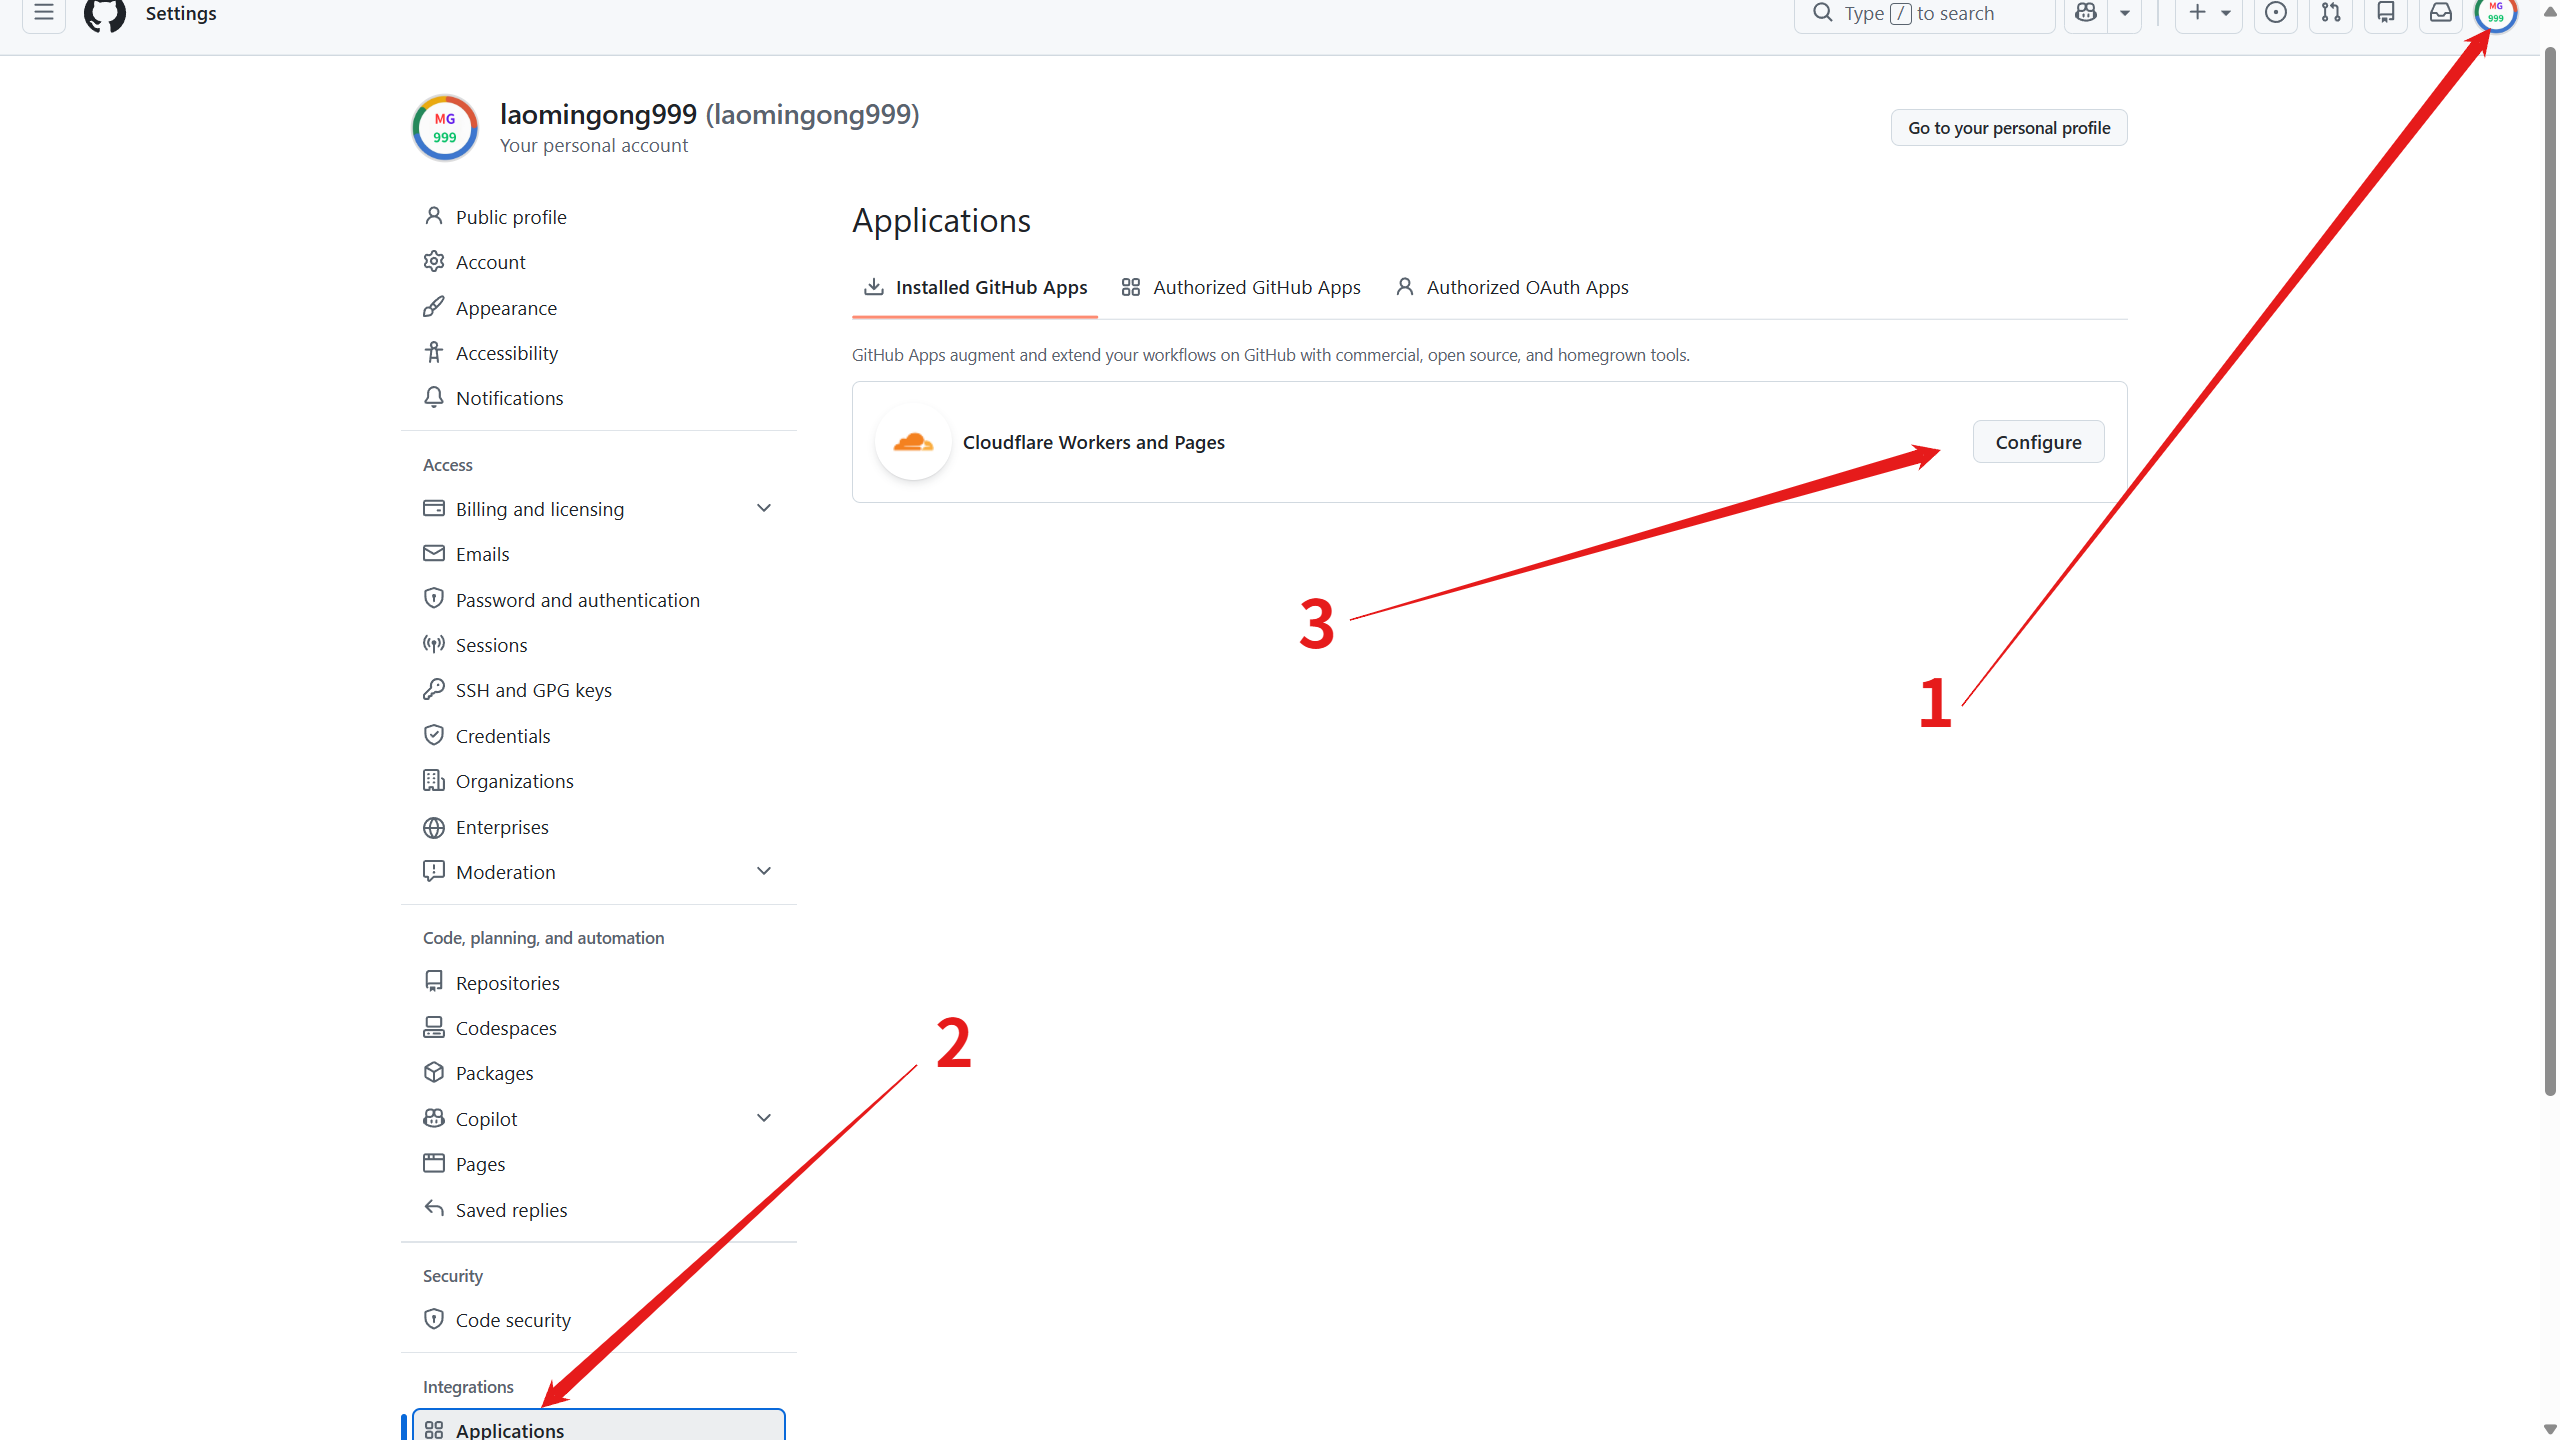
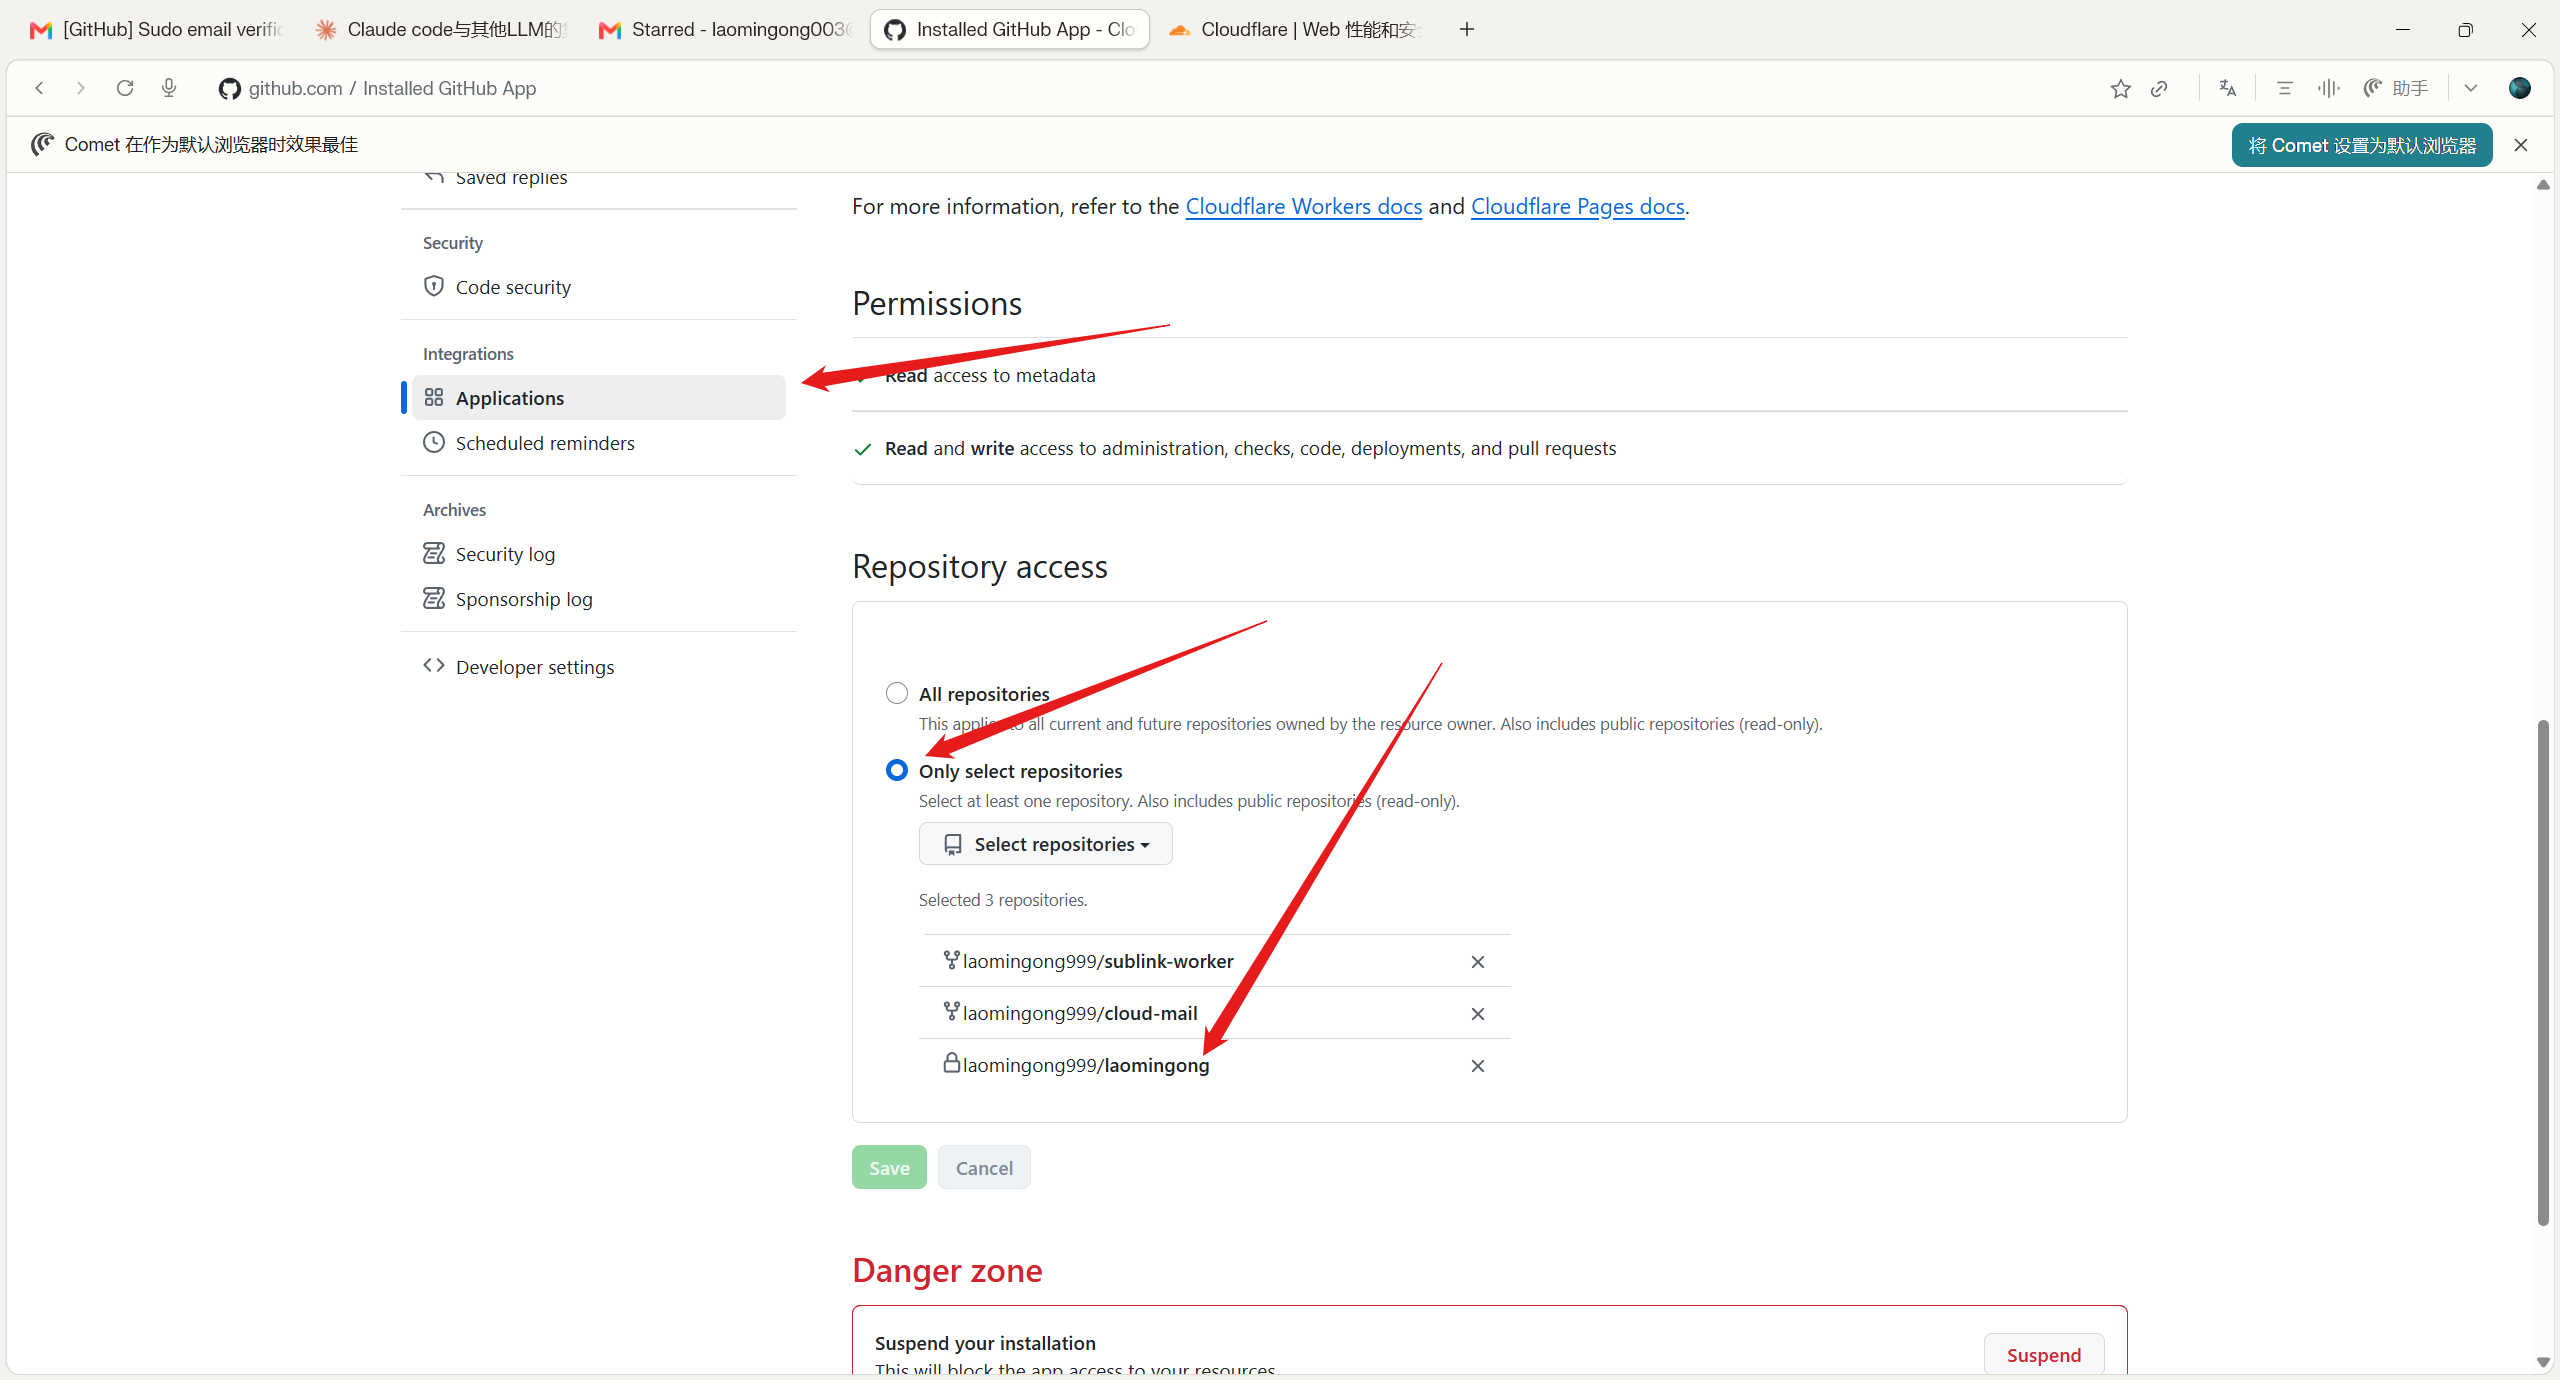
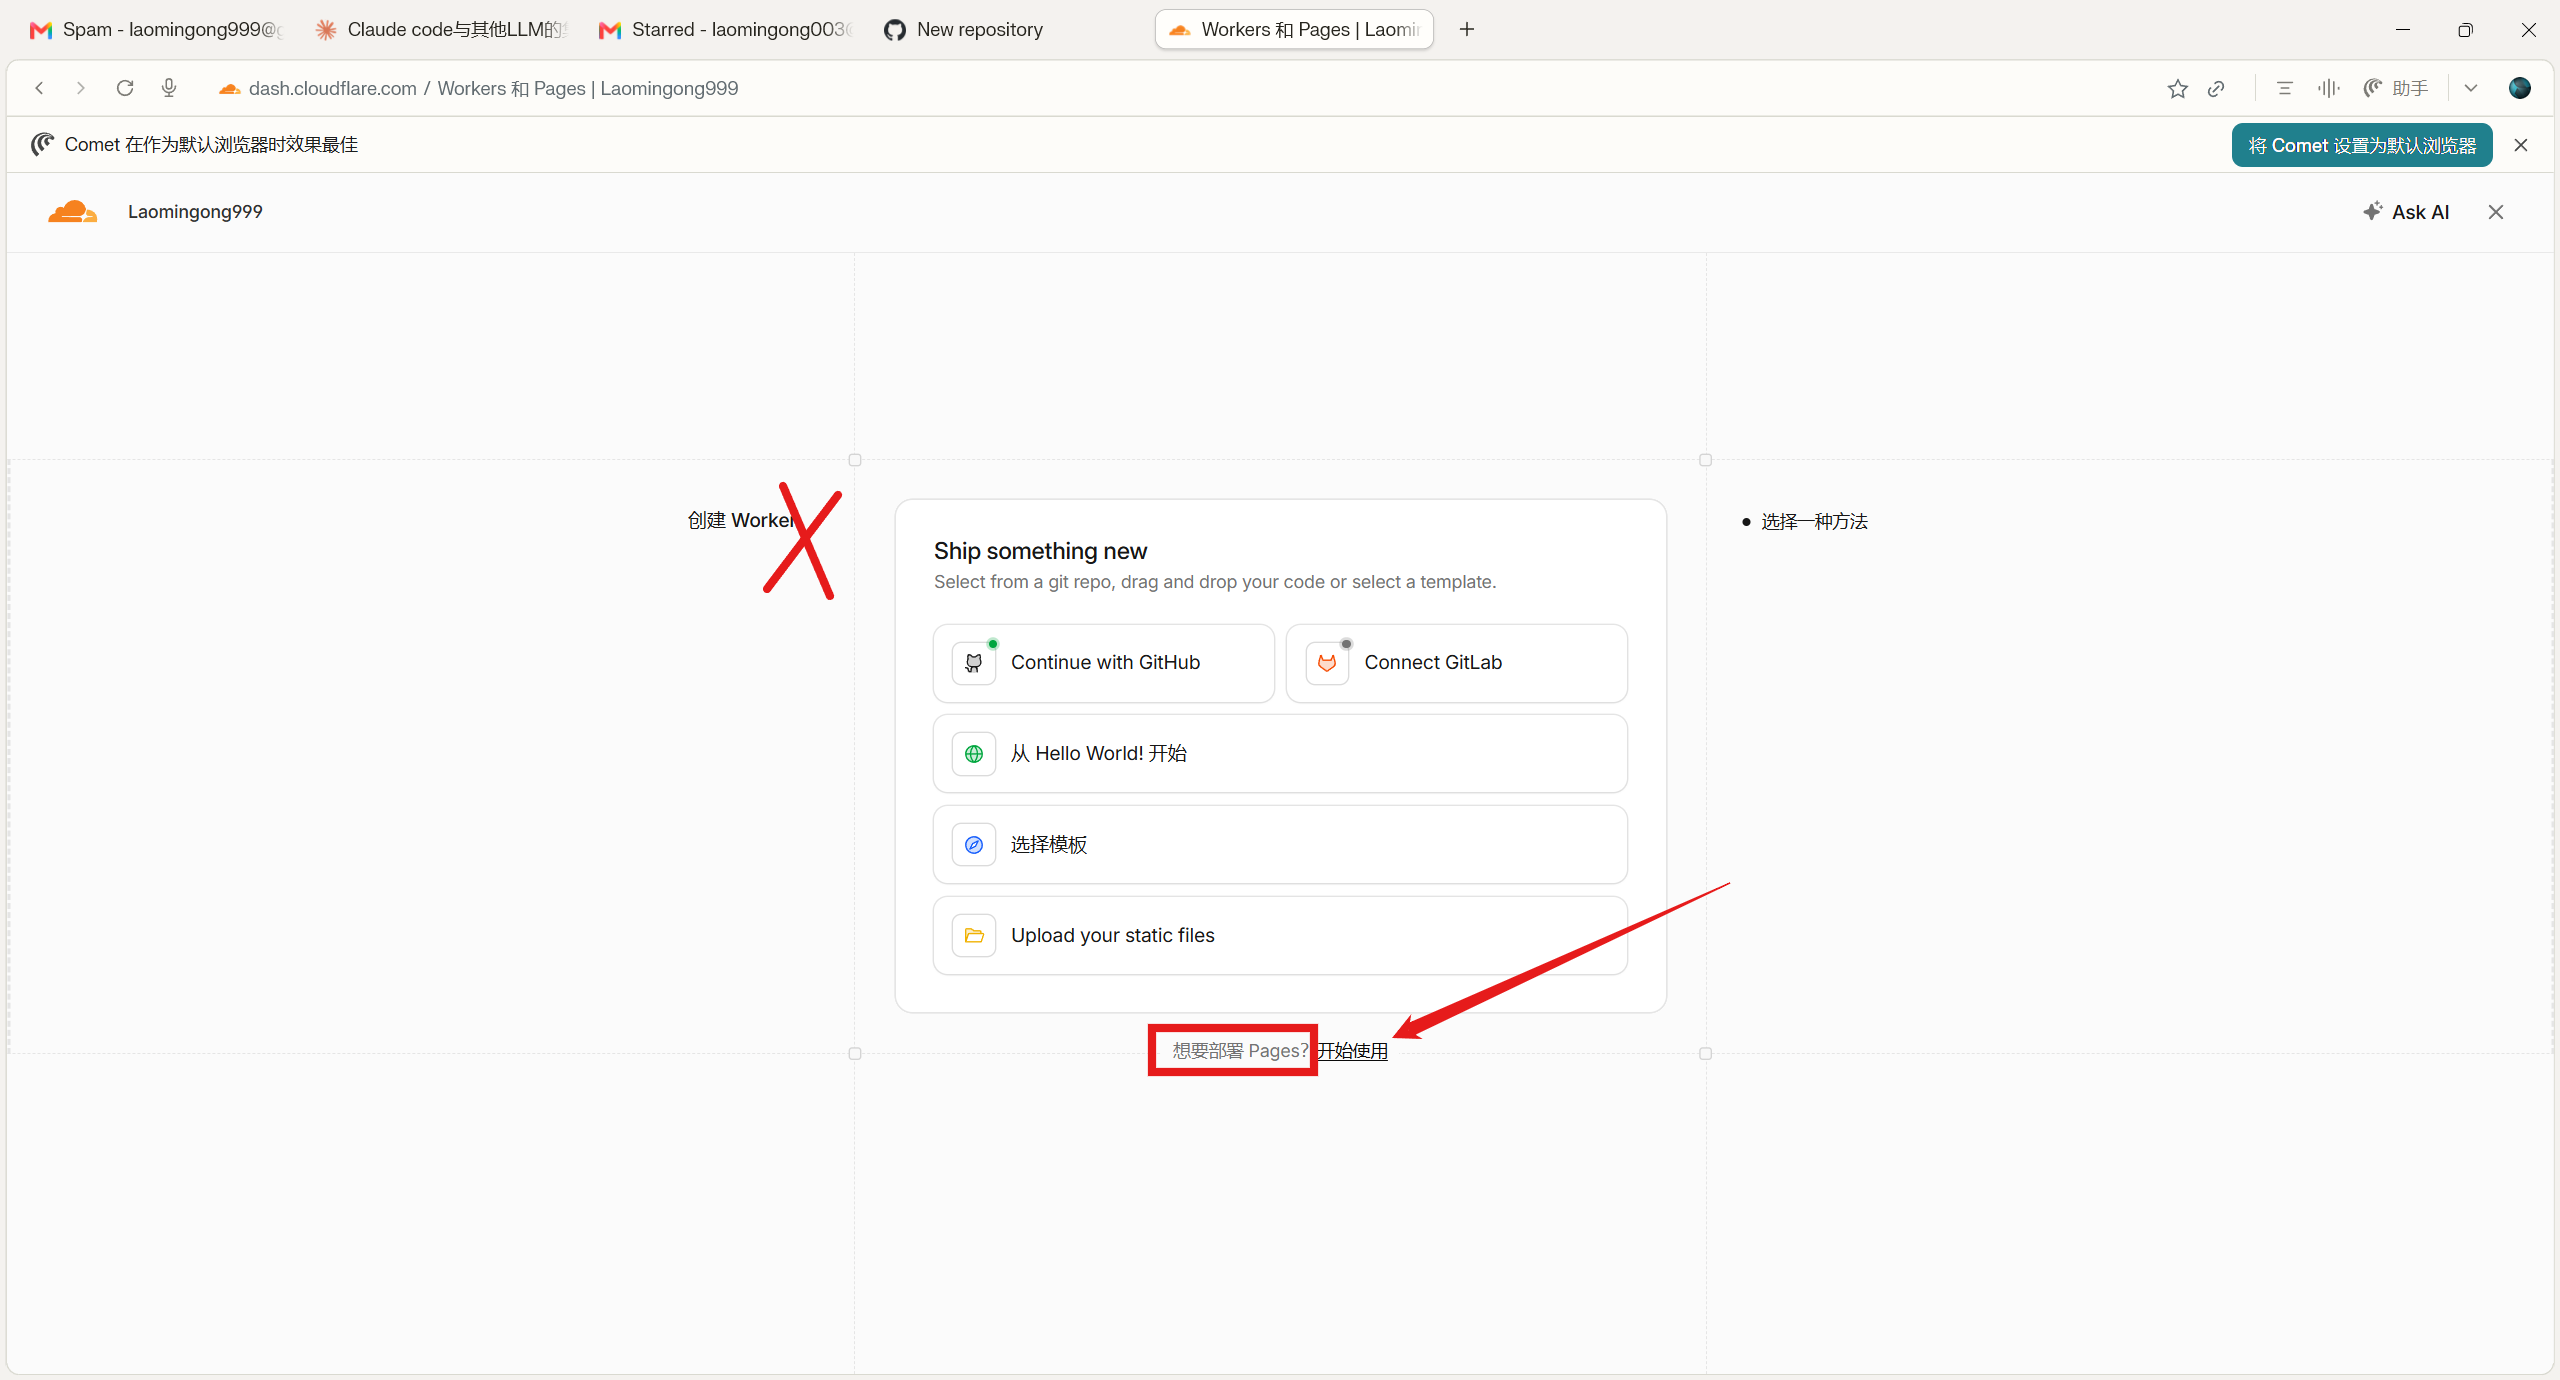
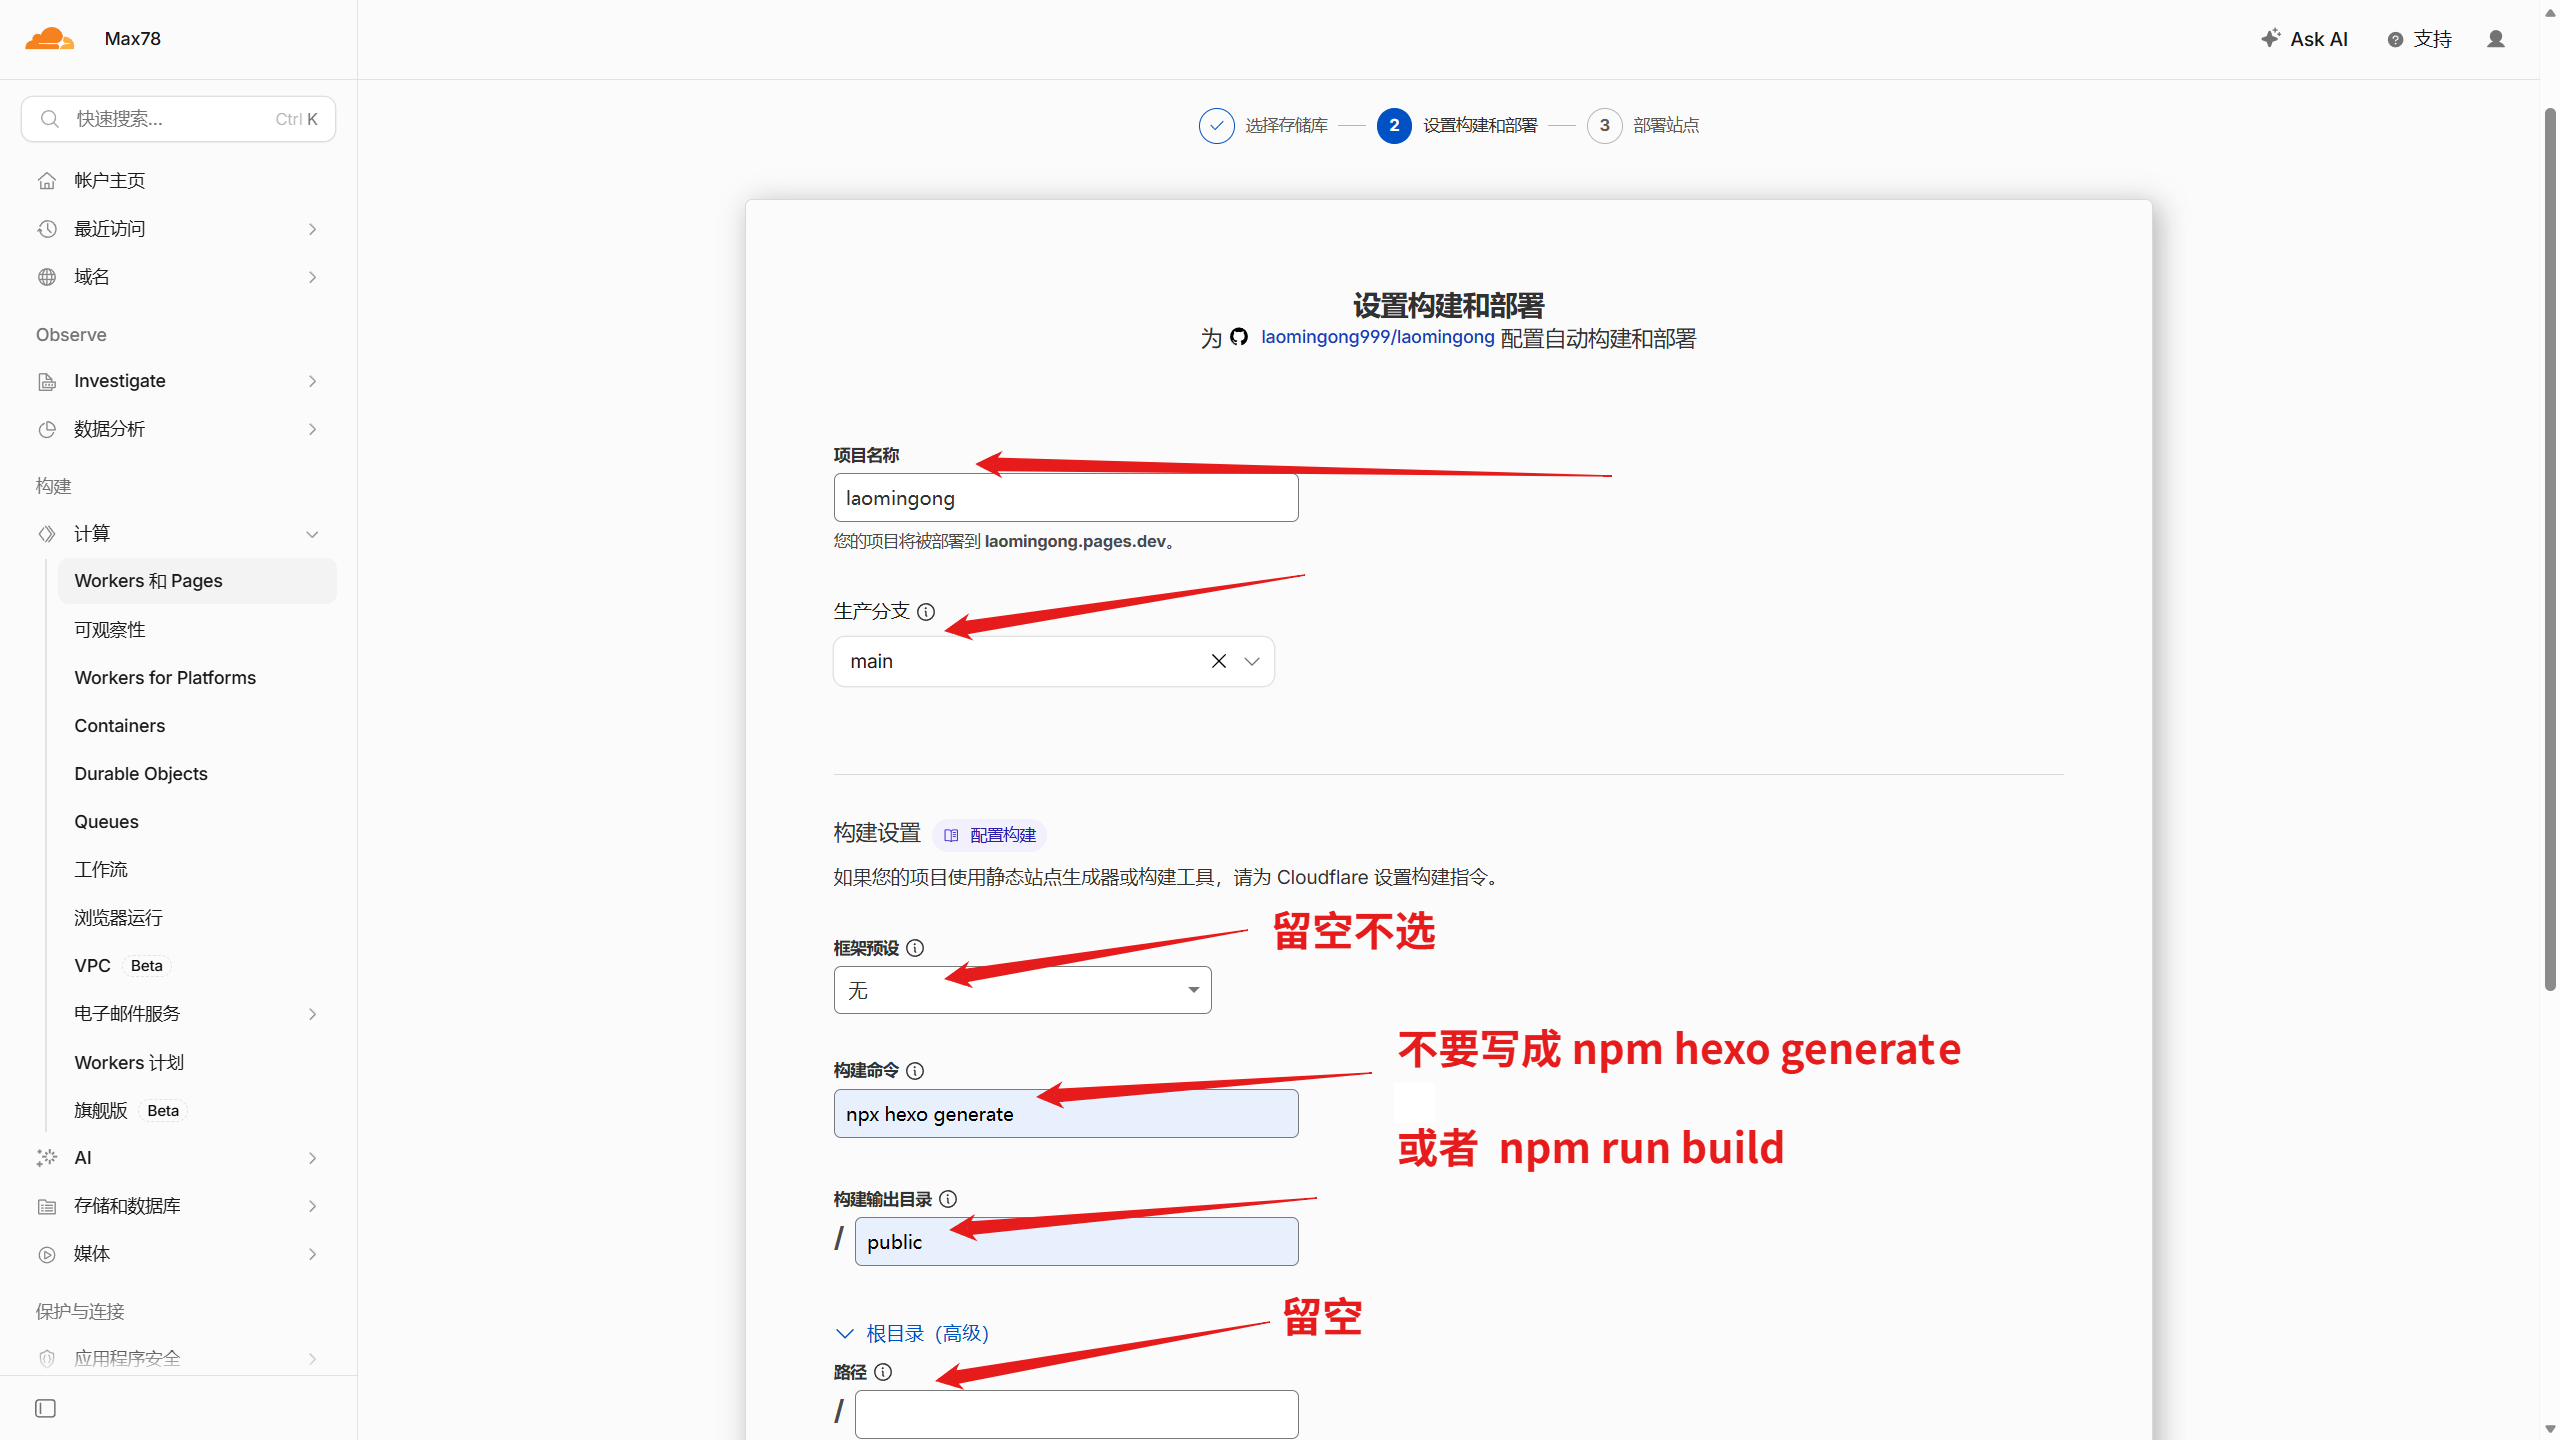
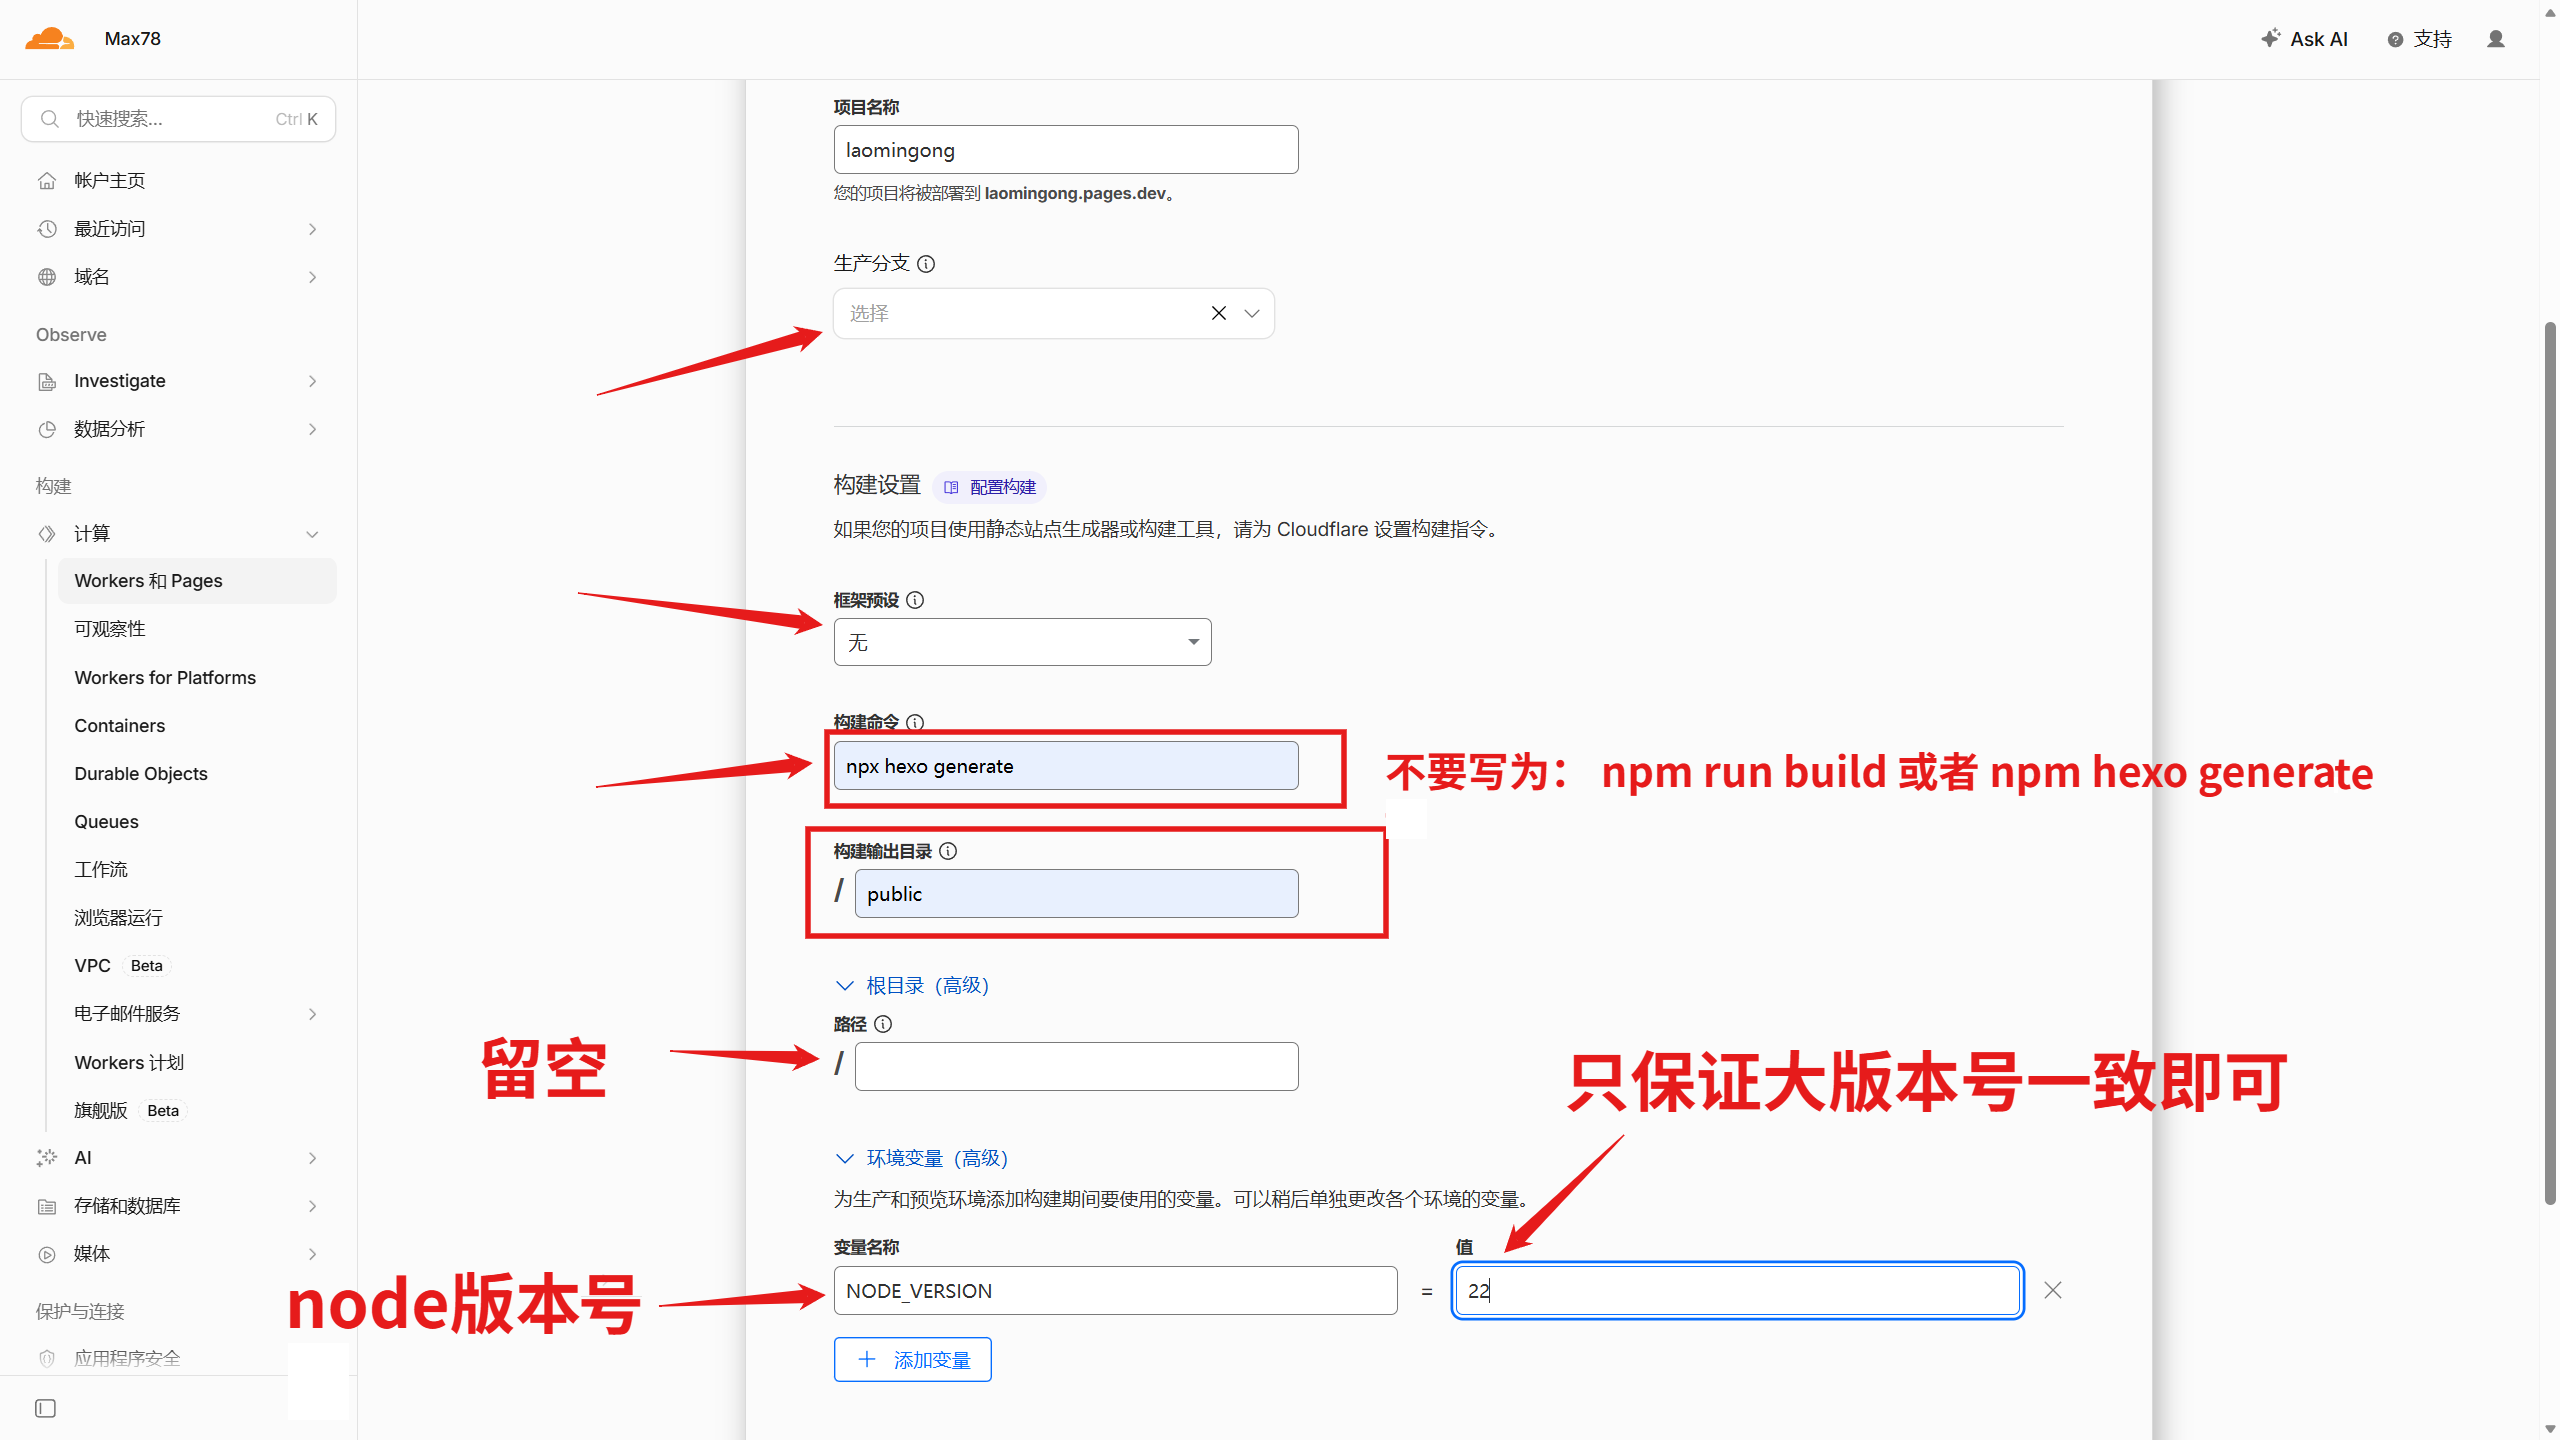
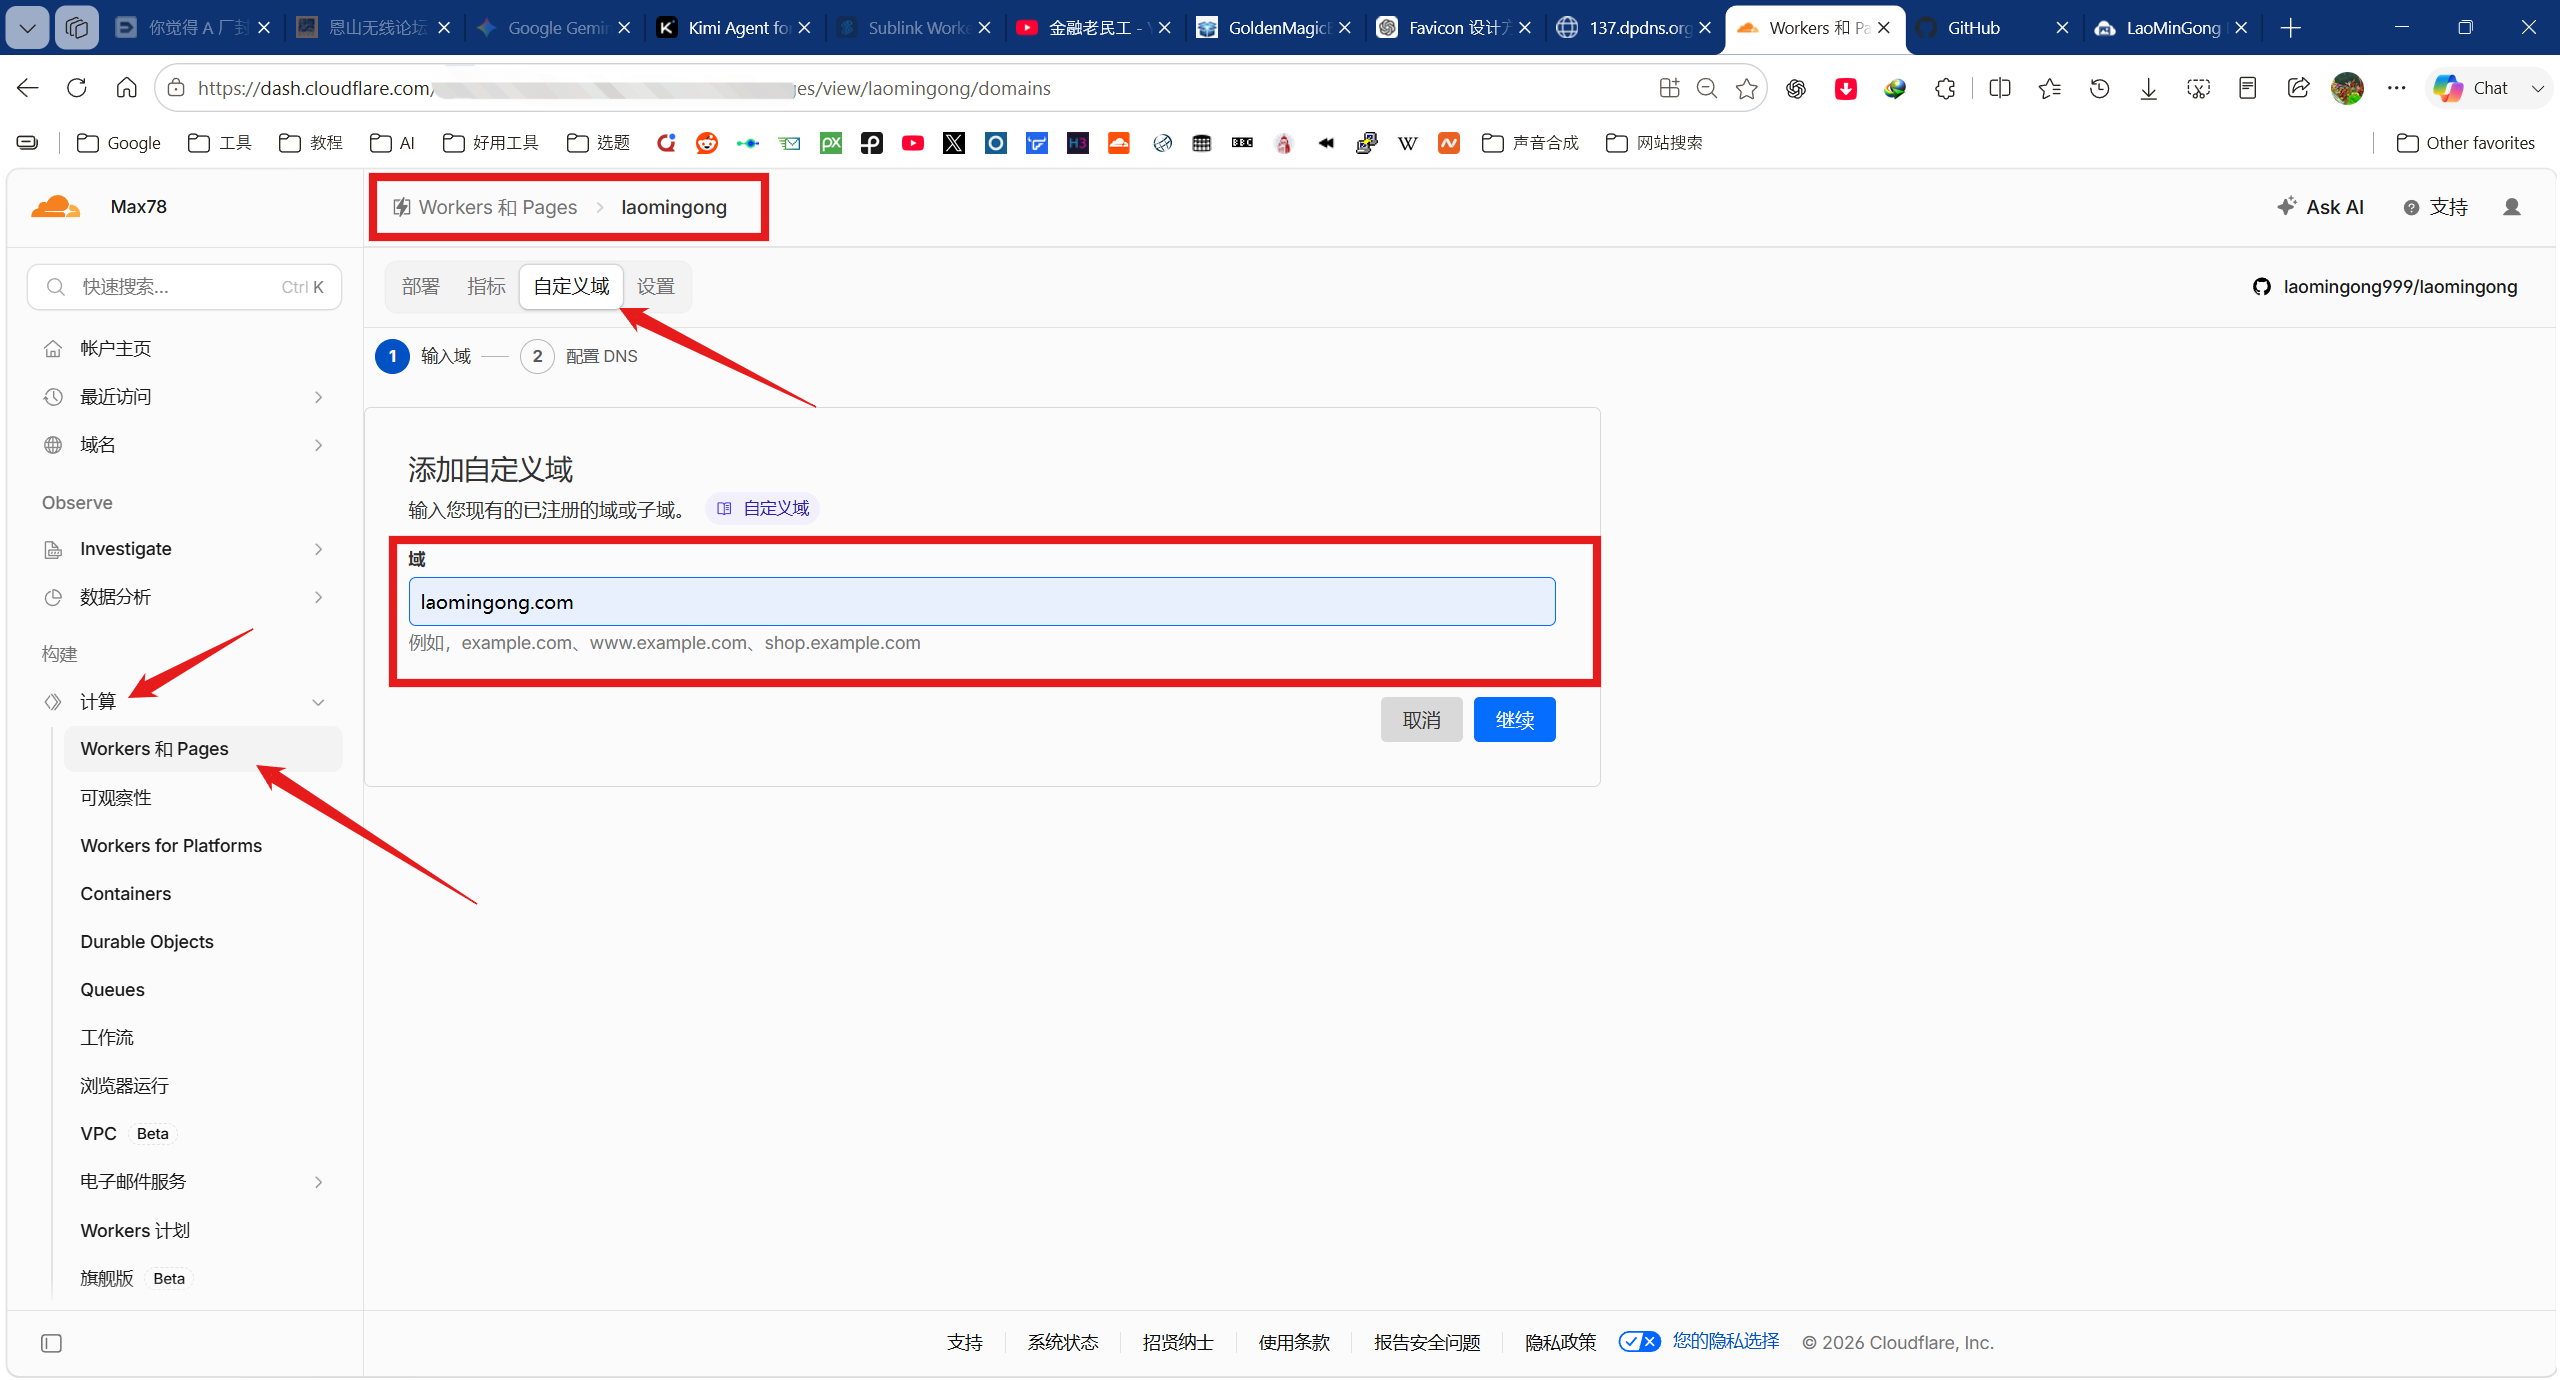
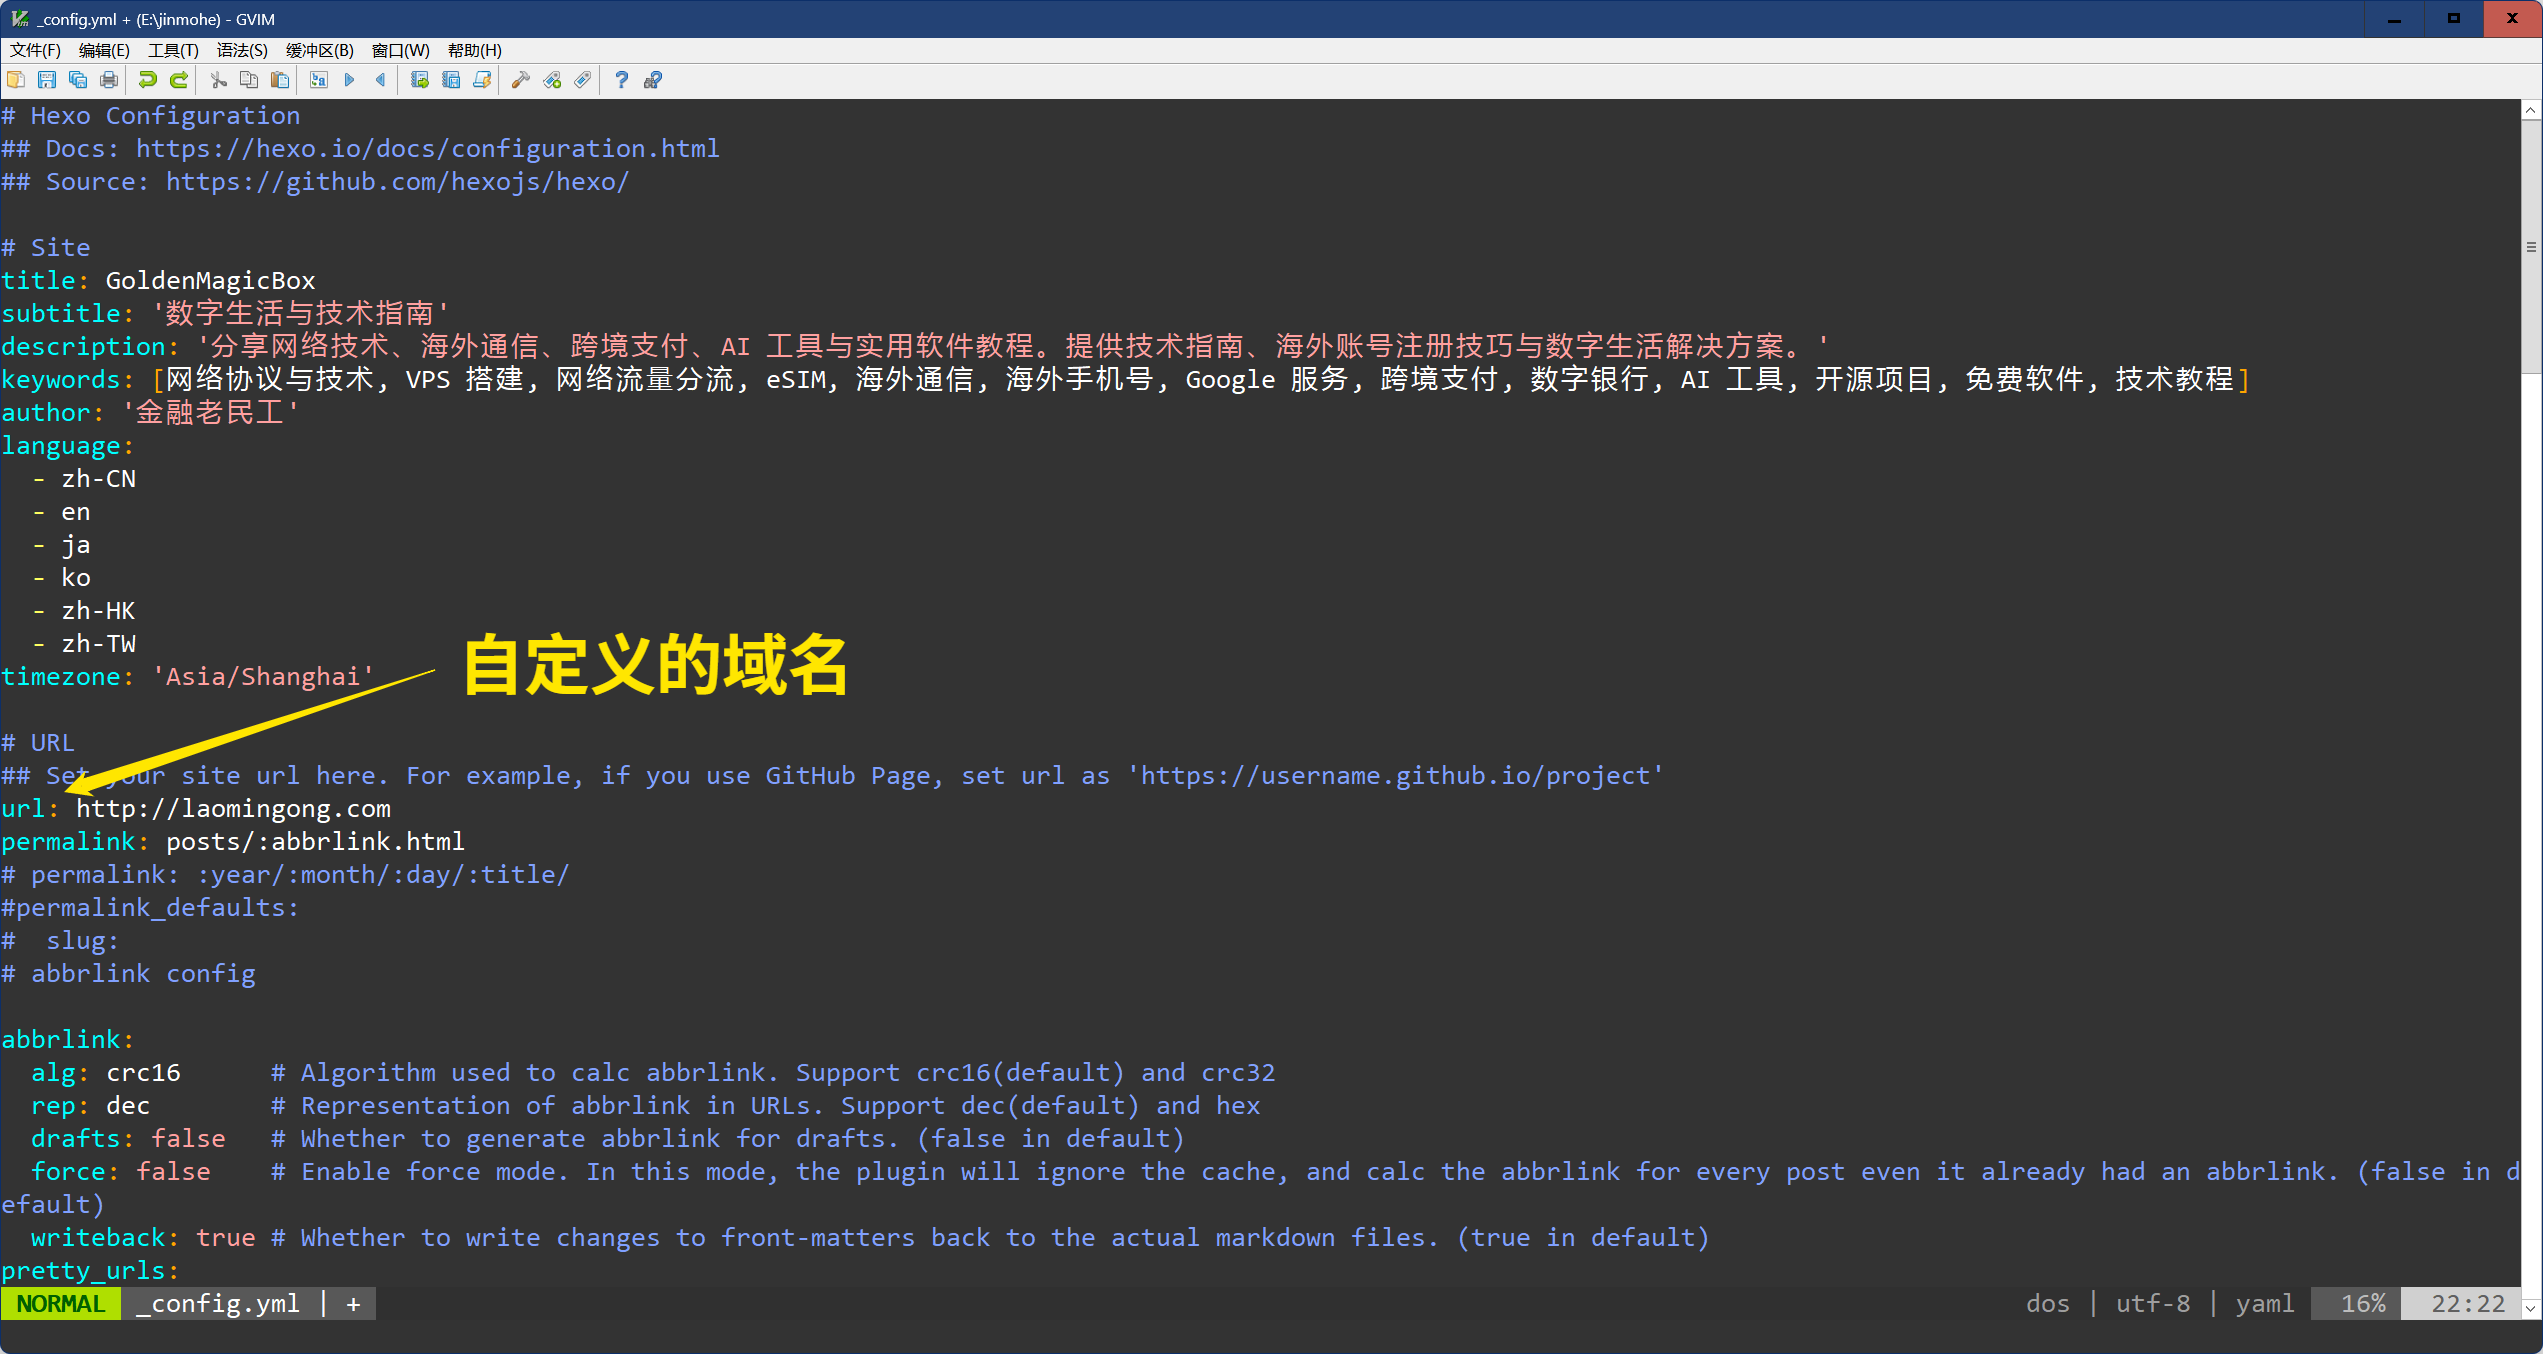
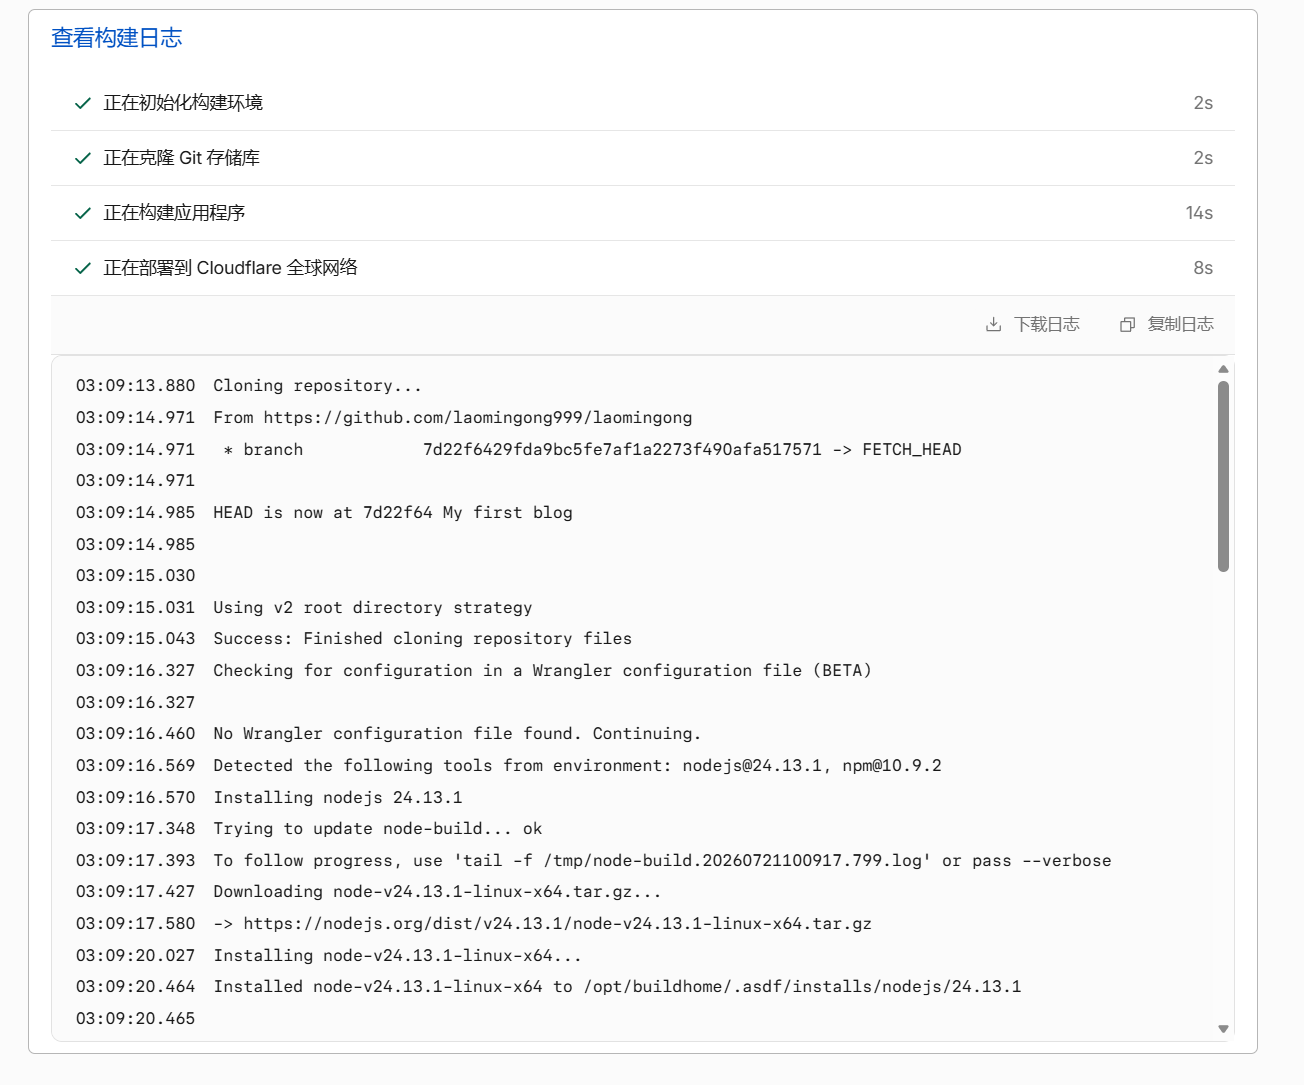
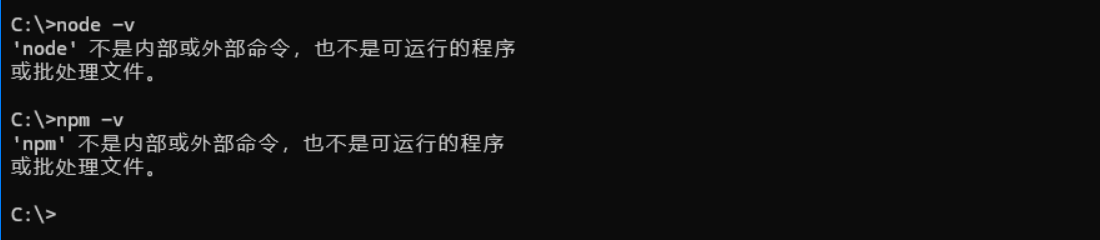
      <![CDATA[<h1 id="🚀-Hexo-GitHub-私有仓库-Cloudflare-Pages-搭建个人博客全攻略"><a href="#🚀-Hexo-GitHub-私有仓库-Cloudflare-Pages-搭建个人博客全攻略" class="headerlink" title="🚀 Hexo + GitHub 私有仓库 + Cloudflare Pages 搭建个人博客全攻略"></a>🚀 Hexo + GitHub 私有仓库 + Cloudflare Pages 搭建个人博客全攻略</h1><p>如果你希望博客源码保存在 GitHub，又不想自己维护服务器，Cloudflare Pages 是一个省心的选择：本地写 Markdown博客文章，推送到 GitHub 后，Cloudflare 自动抓取、生成网页并发布到网站。本教程将带你从零开始，使用 <strong>Node.js</strong> 和 <strong>Git</strong> 在 Windows 环境下配置 Hexo 博客，并将其安全地托管在 <strong>GitHub 私有仓库</strong>中，最后通过 <strong>Cloudflare Pages</strong> 实现全球加速免费部署。</p><p>本教程将实现以下目标：</p><ul><li>一个可以本地预览的 Hexo 博客；</li><li>一个用于保存源码的 GitHub 仓库（建议选择Private私有）；</li><li>一个自动部署的 <code>pages.dev</code> 网站；</li><li>配置自定义域名。</li></ul><blockquote><p>本文记录的是我实际搭建博客的过程。网站面板界面可能随时间变化会有调整，但“本地撰写 → 源码仓库 → 云端构建 → <code>public</code> 目录上线”的逻辑不会变。</p></blockquote><h2 id="⚙️-一、准备工作（运行环境和编辑器安装）"><a href="#⚙️-一、准备工作（运行环境和编辑器安装）" class="headerlink" title="⚙️ 一、准备工作（运行环境和编辑器安装）"></a>⚙️ 一、准备工作（运行环境和编辑器安装）</h2><h3 id="1-安装-Node-js"><a href="#1-安装-Node-js" class="headerlink" title="1. 安装 Node.js"></a>1. 安装 Node.js</h3><p>Hexo 是基于 Node.js 运行的静态博客框架，必须先安装 Node.js 环境。</p><ul><li><strong>下载：</strong> 访问 <a href="https://nodejs.org/">Node.js 官网</a>，建议下载并安装 <strong>LTS（长期支持版）</strong>。</li><li><strong>验证：</strong> 打开电脑的 PowerShell 或 CMD，输入以下命令，看到版本号即代表安装成功：</li></ul><figure class="highlight powershell"><table><tr><td class="gutter"><pre><span class="line">1</span><br><span class="line">2</span><br></pre></td><td class="code"><pre><span class="line">node <span class="literal">-v</span></span><br><span class="line">npm <span class="literal">-v</span></span><br></pre></td></tr></table></figure><blockquote><p>📷 <img src="https://img.didadi.xyz/file/1784623322775_node-v.png" alt="查看node是否安装成功"><br>📷 <img src="https://img.didadi.xyz/file/1784623321464_npm-v.png" alt="查看npm版本"></p></blockquote><h3 id="2-安装-Git"><a href="#2-安装-Git" class="headerlink" title="2. 安装 Git"></a>2. 安装 Git</h3><p>Git 用于管理你的博客源码并将其推送到 GitHub。</p><ul><li><strong>下载：</strong> 访问 <a href="https://git-scm.com/">Git 官网</a> 下载并安装。</li><li><strong>验证：</strong> 在命令行中输入：</li></ul><figure class="highlight powershell"><table><tr><td class="gutter"><pre><span class="line">1</span><br></pre></td><td class="code"><pre><span class="line">git <span class="literal">--version</span> 或者 git <span class="literal">-v</span></span><br></pre></td></tr></table></figure><blockquote><p>📷 <img src="https://img.didadi.xyz/file/1784623320467_git-v-version.png" alt="查看git是否安装成功"></p></blockquote><ul><li><strong>配置初始信息：</strong>（必须配置，否则无法提交代码）</li></ul><figure class="highlight powershell"><table><tr><td class="gutter"><pre><span class="line">1</span><br><span class="line">2</span><br></pre></td><td class="code"><pre><span class="line">git config <span class="literal">--global</span> user.name <span class="string">&quot;你的GitHub用户名&quot;</span></span><br><span class="line">git config <span class="literal">--global</span> user.email <span class="string">&quot;你的GitHub注册邮箱&quot;</span></span><br></pre></td></tr></table></figure><p>编辑器可以使用 VS Code、Notepad++ 或Vim等其他你熟悉的工具。YAML 文件对缩进敏感，不要使用会破坏空格的富文本编辑器。</p><h2 id="🏗️-二、本地初始化-Hexo-博客"><a href="#🏗️-二、本地初始化-Hexo-博客" class="headerlink" title="🏗️ 二、本地初始化 Hexo 博客"></a>🏗️ 二、本地初始化 Hexo 博客</h2><ol><li>在电脑上找一个专门存放博客的位置，创建一个空文件夹（例如 <code>D:\laomingong</code>）。</li><li>在该文件夹内<strong>空白处右键</strong>，选择 <strong>在终端中打开</strong> 或打开 PowerShell 并切换到该目录：</li></ol><figure class="highlight powershell"><table><tr><td class="gutter"><pre><span class="line">1</span><br></pre></td><td class="code"><pre><span class="line"><span class="built_in">cd</span> D:\laomingong</span><br></pre></td></tr></table></figure><ol start="3"><li><strong>全局安装 Hexo 脚手架：</strong></li></ol><figure class="highlight powershell"><table><tr><td class="gutter"><pre><span class="line">1</span><br></pre></td><td class="code"><pre><span class="line">npm install <span class="literal">-g</span> hexo<span class="literal">-cli</span></span><br></pre></td></tr></table></figure><ol start="4"><li><strong>初始化 Hexo 模板：</strong>（后面的 <code>.</code> 代表在当前文件夹直接生成）</li></ol><figure class="highlight powershell"><table><tr><td class="gutter"><pre><span class="line">1</span><br></pre></td><td class="code"><pre><span class="line">hexo init .</span><br></pre></td></tr></table></figure><ol start="5"><li><strong>一键安装依赖：</strong>（使用自动生成的 <code>package.json</code> 清单下载插件）</li></ol><figure class="highlight powershell"><table><tr><td class="gutter"><pre><span class="line">1</span><br></pre></td><td class="code"><pre><span class="line">npm install</span><br></pre></td></tr></table></figure><blockquote><p>💡 <strong>本地预览：</strong> 此时输入 <code>hexo s</code> 或者 <code>hexo server | npx hexo server</code>，并在浏览器打开 <code>http://localhost:4000</code>，即可看到你的博客页面。在终端按 <code>Ctrl + C</code> 可停止预览。</p></blockquote><blockquote><p>📷 <img src="https://img.didadi.xyz/file/1784624990270_localhost.png" alt="localhost.png"></p></blockquote><h3 id="新建一篇文章"><a href="#新建一篇文章" class="headerlink" title="新建一篇文章"></a>新建一篇文章</h3><figure class="highlight powershell"><table><tr><td class="gutter"><pre><span class="line">1</span><br></pre></td><td class="code"><pre><span class="line">hexo new <span class="string">&quot;我的第一篇文章&quot;</span> 或者 hexo n <span class="string">&quot;我的第一篇文章&quot;</span></span><br></pre></td></tr></table></figure><p>文章会出现在 <code>source\_posts</code>文件夹中。用编辑器打开 Markdown 文件，在第二个 <code>---</code> 后写正文，再次运行下面的命令即可预览。</p><h3 id="重新生成内容"><a href="#重新生成内容" class="headerlink" title="重新生成内容"></a>重新生成内容</h3><figure class="highlight powershell"><table><tr><td class="gutter"><pre><span class="line">1</span><br><span class="line">2</span><br><span class="line">3</span><br></pre></td><td class="code"><pre><span class="line">hexo <span class="built_in">clear</span></span><br><span class="line">hexo generate</span><br><span class="line">hexo server</span><br></pre></td></tr></table></figure><p>上述命令也可以简写为</p><figure class="highlight powershell"><table><tr><td class="gutter"><pre><span class="line">1</span><br><span class="line">2</span><br><span class="line">3</span><br></pre></td><td class="code"><pre><span class="line">hexo cl</span><br><span class="line">hexo g</span><br><span class="line">hexo s</span><br></pre></td></tr></table></figure><p>成功后会生成 <code>public</code> 文件夹。Cloudflare Pages 做的事情，本质上就是在云端重复构建博客内容并发布。</p><h2 id="🔐-三、配置-GitHub-私有仓库"><a href="#🔐-三、配置-GitHub-私有仓库" class="headerlink" title="🔐 三、配置 GitHub 私有仓库"></a>🔐 三、配置 GitHub 私有仓库</h2><p>为了保护你的源码（包括未来的草稿、隐私配置等），我们将其上传到 GitHub 的<strong>私有仓库</strong>中。</p><h3 id="1-解决跨平台换行符警告"><a href="#1-解决跨平台换行符警告" class="headerlink" title="1. 解决跨平台换行符警告"></a>1. 解决跨平台换行符警告</h3><p>由于跨平台换行符差异，Windows 用户在提交前建议关闭自动转换提示，避免终端报错：</p><blockquote><p>📷 <img src="https://img.didadi.xyz/file/1784627257611_CRLF%E4%BF%AE%E6%AD%A3.png" alt="跨平台时的CRLF修正"></p></blockquote><figure class="highlight powershell"><table><tr><td class="gutter"><pre><span class="line">1</span><br></pre></td><td class="code"><pre><span class="line">git config <span class="literal">--global</span> core.safecrlf false</span><br></pre></td></tr></table></figure><h3 id="2-本地初始化-Git-仓库"><a href="#2-本地初始化-Git-仓库" class="headerlink" title="2. 本地初始化 Git 仓库"></a>2. 本地初始化 Git 仓库</h3><p>在博客根目录（<code>D:\laomingong</code>）下执行：</p><figure class="highlight powershell"><table><tr><td class="gutter"><pre><span class="line">1</span><br><span class="line">2</span><br><span class="line">3</span><br></pre></td><td class="code"><pre><span class="line">git init</span><br><span class="line">git add .</span><br><span class="line">git commit <span class="literal">-m</span> <span class="string">&quot;我的第一篇文章&quot;</span></span><br></pre></td></tr></table></figure><h3 id="3-建立-GitHub-私有仓库"><a href="#3-建立-GitHub-私有仓库" class="headerlink" title="3. 建立 GitHub 私有仓库"></a>3. 建立 GitHub 私有仓库</h3><ol><li>登录 <a href="https://github.com/">GitHub</a>，点击右上角的头像 -&gt; 选择 <strong>Repositories</strong> -&gt; <strong>New</strong> 或者直接点击左侧的 <strong>New</strong> 创建新仓库。</li></ol><blockquote><p>📷 <img src="https://img.didadi.xyz/file/1784680225509_repositories.png" alt="创建新仓库"></p></blockquote><ol start="2"><li><strong>Repository name：</strong> 输入你的仓库名（例如 <code>laomingong</code>）。</li><li><strong>Public&#x2F;Private：</strong> Public和Private均可，但为了更好地保护源码，建议选择 <strong>Private（私有）</strong>。</li><li>其他选项（README、.gitignore）<strong>不要</strong>勾选，保持默认即可。</li><li>点击 <strong>Create repository</strong>。</li></ol><blockquote><p>📷 <img src="https://img.didadi.xyz/file/1784623322861_createrepository.png" alt="仓库信息设置"></p></blockquote><h3 id="4-绑定并首次推送"><a href="#4-绑定并首次推送" class="headerlink" title="4. 绑定并首次推送"></a>4. 绑定并首次推送</h3><p>在 GitHub 生成的空白页面上，复制你的 <strong>HTTPS 链接</strong>（格式为 <code>[https://github.com/用户名/仓库名.git](https://github.com/用户名/仓库名.git)</code>）。</p><hr><h2 id=""><a href="#" class="headerlink" title=""></a><img src="https://img.didadi.xyz/file/1784680682462_repository_url.png" alt="仓库下载地址"></h2><p>在本地终端运行下面的命令：</p><figure class="highlight powershell"><table><tr><td class="gutter"><pre><span class="line">1</span><br><span class="line">2</span><br><span class="line">3</span><br><span class="line">4</span><br><span class="line">5</span><br><span class="line">6</span><br><span class="line">7</span><br><span class="line">8</span><br></pre></td><td class="code"><pre><span class="line"><span class="comment"># 1. 绑定远程仓库（将下面链接换成你自己的）</span></span><br><span class="line">git remote add origin https://github.com/你的用户名/你的仓库名.git</span><br><span class="line"></span><br><span class="line"><span class="comment"># 2. 将本地默认分支重命名为 main</span></span><br><span class="line">git branch <span class="literal">-M</span> main</span><br><span class="line"></span><br><span class="line"><span class="comment"># 3. 首次推送并建立绑定关系（会弹出浏览器要求进行 GitHub 账号授权验证）</span></span><br><span class="line">git push <span class="literal">-u</span> origin main</span><br></pre></td></tr></table></figure><blockquote><p>📷 <img src="https://img.didadi.xyz/file/1784623326198_blogroot.png" alt="博客根目录文件列表"></p></blockquote><p>Hexo 默认生成的 <code>.gitignore</code> 通常会排除 <code>node_modules</code> 和 <code>public</code>。提交前建议打开确认，避免把依赖目录和构建产物上传到源码仓库。不要把访问令牌或其他密钥写进 <code>_config.yml</code> 文件。</p><h3 id="5-验证绑定是否成功-在命令行输入命令："><a href="#5-验证绑定是否成功-在命令行输入命令：" class="headerlink" title="5. 验证绑定是否成功:在命令行输入命令："></a>5. 验证绑定是否成功:在命令行输入命令：</h3><figure class="highlight powershell"><table><tr><td class="gutter"><pre><span class="line">1</span><br></pre></td><td class="code"><pre><span class="line">git remote <span class="literal">-v</span></span><br></pre></td></tr></table></figure><p><strong>如返回下面的信息，则证明绑定成功：</strong></p><p><img src="https://img.didadi.xyz/file/1784681130435_remote-v.png" alt="查看仓库是否绑定成功"></p><figure class="highlight powershell"><table><tr><td class="gutter"><pre><span class="line">1</span><br><span class="line">2</span><br></pre></td><td class="code"><pre><span class="line">origin  https://github.com/你的用户名/仓库名 (fetch)</span><br><span class="line">origin  https://github.com/你的用户名/仓库名 (push)</span><br></pre></td></tr></table></figure><hr><h2 id="☁️-四、配置-Cloudflare-Pages-自动化部署"><a href="#☁️-四、配置-Cloudflare-Pages-自动化部署" class="headerlink" title="☁️ 四、配置 Cloudflare Pages 自动化部署"></a>☁️ 四、配置 Cloudflare Pages 自动化部署</h2><p>Cloudflare Pages 会在云端自动读取你的 GitHub 私有仓库，通过服务器把 Markdown 编译成静态网页并发布。</p><h3 id="1-创建-Pages-项目"><a href="#1-创建-Pages-项目" class="headerlink" title="1. 创建 Pages 项目"></a>1. 创建 Pages 项目</h3><ol><li>登录 <a href="https://dash.cloudflare.com/">Cloudflare 控制台</a>。</li><li>点击左侧菜单栏的 <strong>计算</strong> -&gt; <strong>Workers 和 Pages</strong> -&gt; 点击 <strong>创建应用程序</strong>。</li><li>选择 <strong>Pages</strong> 标签页，点击 <strong>导入现在 Git存储库</strong> -&gt; <strong>开始使用</strong>。</li><li>按照提示授权你的 GitHub 账号，并从列表中选择你刚刚创建的 <strong><code>laomingong</code>（私有仓库）</strong>，点击 <strong>开始设置</strong>。</li></ol><hr><blockquote><p>📷 <img src="https://img.didadi.xyz/file/1784623321724_github-cloudflare.png" alt="GitHub仓库选择"></p></blockquote><hr><p>私有仓库也能连接，但授权时应遵循最小权限原则，只开放需要部署的仓库。</p><blockquote><p>📷 <img src="https://img.didadi.xyz/file/1784623327471_selectrepository1.png" alt="selectrepository1.png"></p></blockquote><hr><blockquote><p>📷 <img src="https://img.didadi.xyz/file/1784623325766_selectrepository2.png" alt="selectrepository2.png"></p></blockquote><hr><blockquote><p>📷 <img src="https://img.didadi.xyz/file/1784623327910_cloudflarepages.png" alt="创建Cloudflare Pages"></p></blockquote><h3 id="2-核心构建参数配置（关键步骤）"><a href="#2-核心构建参数配置（关键步骤）" class="headerlink" title="2. 核心构建参数配置（关键步骤）"></a>2. 核心构建参数配置（关键步骤）</h3><p>在设置页面，请严格按照以下参数填写：</p><ul><li><strong>项目名称：</strong> 保持默认（或自定义）</li><li><strong>生产分支：</strong> <code>main</code></li><li><strong>框架预设 (Framework preset)：</strong> 选择 <strong><code>None</code></strong>（保持未选择状态）</li><li><strong>构建命令 (Build command)：</strong> 填入 <code>npx hexo generate</code> 或者 <code>npx hexo clean &amp;&amp;　npx hexo generate</code></li><li><strong>构建输出目录 (Build output directory)：</strong> 填入 <code>public</code></li><li><strong>根目录 (Root directory)：</strong> <strong>保持留空</strong>，不用填写。</li></ul><p><strong>构建命令务必填写 <code>npx hexo generate</code> 或 <code>npx hexo g</code> 或 <code>npx hexo clean &amp;&amp;　npx hexo generate</code>，不要写为 <code>npm hexo generate</code> 或 <code>npm run build</code></strong></p><blockquote><p>📷 <img src="https://img.didadi.xyz/file/1784630319753_build1.png" alt="构建参数"></p></blockquote><h3 id="3-极重要：配置环境变量"><a href="#3-极重要：配置环境变量" class="headerlink" title="3. 极重要：配置环境变量"></a>3. 极重要：配置环境变量</h3><p>由于 Hexo 新版本需要较高版本的 Node.js 环境，必须手动指定：</p><ol><li>在当前页面下方展开 <strong>环境变量（高级）</strong> 区域。</li><li>点击 <strong>添加变量</strong>：</li></ol><ul><li><strong>变量名称 (Variable name)：</strong> <code>NODE_VERSION</code></li><li><strong>值 (Value)：</strong> <code>24</code> <em>(直接填大版本号即可)</em> <strong>版本号一定要和本地node版本保持一致，本地node版本号使用命令 <code>node -v</code> 查看</strong></li></ul><blockquote><p>📷 <img src="https://img.didadi.xyz/file/1784632699364_build2.png" alt="构建参数"></p></blockquote><ol start="3"><li>点击最下方的 <strong>保存并部署</strong>。</li></ol><blockquote><p>🎉 <strong>大功告成！</strong> 几分钟后，Cloudflare 就会提示部署成功，并会为你分配一个免费的 <code>xxx.pages.dev</code> 专属二级域名，点击即可访问你的个人博客！</p></blockquote><h2 id="🌐-五、绑定独立域名"><a href="#🌐-五、绑定独立域名" class="headerlink" title="🌐 五、绑定独立域名"></a>🌐 五、绑定独立域名</h2><p>系统分配的域名难以记忆，可以在 Pages 项目中进入 <code>Custom domains自定义域</code>，添加自己的域名，例如 <code>laomingong.com</code>：</p><ul><li>域名已托管在同一 Cloudflare 账号：通常可自动创建 DNS 记录；</li><li>域名在其他 DNS 服务商：按页面提示添加 <code>CNAME</code>；</li></ul><blockquote><p>📷 <img src="https://img.didadi.xyz/file/1784628708578_cloudflaredomain.png" alt="在Cloudflare中配置域名"></p></blockquote><p>同时在 Hexo 根目录的 <code>_config.yml</code> 设置正式网址：</p><figure class="highlight yaml"><table><tr><td class="gutter"><pre><span class="line">1</span><br></pre></td><td class="code"><pre><span class="line"><span class="attr">url:</span> <span class="string">https://laomingong.com</span></span><br></pre></td></tr></table></figure><blockquote><p>📷 <img src="https://img.didadi.xyz/file/1784623324361_domain-config.png" alt="配置文件中自定义域名"></p></blockquote><p>修改后提交并推送：</p><figure class="highlight powershell"><table><tr><td class="gutter"><pre><span class="line">1</span><br><span class="line">2</span><br><span class="line">3</span><br></pre></td><td class="code"><pre><span class="line">git add .</span><br><span class="line">git commit <span class="literal">-m</span> <span class="string">&quot;配置博客独立域名&quot;</span></span><br><span class="line">git push</span><br></pre></td></tr></table></figure><h2 id="📅-六、日常撰写博客与文章发布流程"><a href="#📅-六、日常撰写博客与文章发布流程" class="headerlink" title="📅 六、日常撰写博客与文章发布流程"></a>📅 六、日常撰写博客与文章发布流程</h2><p>以后每当你写了新文章，或者修改了博客配置，只需要在本地终端固定执行“日常三部曲”，线上的博客就会自动同步更新：</p><figure class="highlight powershell"><table><tr><td class="gutter"><pre><span class="line">1</span><br><span class="line">2</span><br><span class="line">3</span><br><span class="line">4</span><br><span class="line">5</span><br><span class="line">6</span><br><span class="line">7</span><br><span class="line">8</span><br></pre></td><td class="code"><pre><span class="line"><span class="comment"># 1. 将所有修改或新文章登记到暂存区</span></span><br><span class="line">git add .</span><br><span class="line"></span><br><span class="line"><span class="comment"># 2. 提交到本地记录，并写下本次更新了什么</span></span><br><span class="line">git commit <span class="literal">-m</span> <span class="string">&quot;更新了一篇关于Git的新博客&quot;</span></span><br><span class="line"></span><br><span class="line"><span class="comment"># 3. 一键推送到 GitHub（首次加 -u 参数，以后只需直接打 git push）</span></span><br><span class="line">git push</span><br></pre></td></tr></table></figure><p><strong>自动运行逻辑：</strong> 当你敲下 <code>git push</code> 后，GitHub 私有仓库会收到最新的代码 ➔ Cloudflare Pages 检测到代码变动 ➔ 自动在云端执行 <code>npx hexo generate</code> ➔ 几秒钟后，你的个人博客网站便完成了全网更新！</p><blockquote><p>📷  <img src="https://img.didadi.xyz/file/1784628720692_buildlog.png" alt="部署日志"></p></blockquote><h2 id="🖥️-七、换电脑之后或者使用多台电脑写博客的操作"><a href="#🖥️-七、换电脑之后或者使用多台电脑写博客的操作" class="headerlink" title="🖥️ 七、换电脑之后或者使用多台电脑写博客的操作"></a>🖥️ 七、换电脑之后或者使用多台电脑写博客的操作</h2><p>换电脑后，不要重新执行 <code>hexo init</code>，也不需要重新连接 Cloudflare Pages。只要把 GitHub 中保存的 Hexo 源码克隆到新电脑，就能继续写文章。</p><h3 id="1、新电脑首次配置"><a href="#1、新电脑首次配置" class="headerlink" title="1、新电脑首次配置"></a>1、新电脑首次配置</h3><h4 id="还是先下载安装-node-js-和-Git-验证成功后，使用-git-config-global-命令配置用户名和邮箱。这一步和前面一样。"><a href="#还是先下载安装-node-js-和-Git-验证成功后，使用-git-config-global-命令配置用户名和邮箱。这一步和前面一样。" class="headerlink" title="还是先下载安装 node.js 和 Git,验证成功后，使用 git config --global 命令配置用户名和邮箱。这一步和前面一样。"></a>还是先下载安装 node.js 和 Git,验证成功后，使用 <code>git config --global</code> 命令配置用户名和邮箱。这一步和前面一样。</h4><h4 id="接下来克隆博客源码，在-GitHub-博客仓库页面点击-Code，复制-HTTPS-地址，然后在新电脑执行："><a href="#接下来克隆博客源码，在-GitHub-博客仓库页面点击-Code，复制-HTTPS-地址，然后在新电脑执行：" class="headerlink" title="接下来克隆博客源码，在 GitHub 博客仓库页面点击 Code，复制 HTTPS 地址，然后在新电脑执行："></a>接下来克隆博客源码，在 GitHub 博客仓库页面点击 Code，复制 HTTPS 地址，然后在新电脑执行：</h4><figure class="highlight powershell"><table><tr><td class="gutter"><pre><span class="line">1</span><br><span class="line">2</span><br><span class="line">3</span><br></pre></td><td class="code"><pre><span class="line"><span class="built_in">cd</span> D:\</span><br><span class="line">git clone <span class="literal">--recurse-submodules</span> https://github.com/你的用户名/仓库名.git</span><br><span class="line"><span class="built_in">cd</span> 仓库名</span><br></pre></td></tr></table></figure><p><code>--recurse-submodules</code> 可以同时下载以 Git 子模块形式安装的 Hexo 主题。</p><h4 id="恢复项目依赖"><a href="#恢复项目依赖" class="headerlink" title="恢复项目依赖"></a>恢复项目依赖</h4><p>仓库一般不会上传 node_modules，所以需要重新安装：</p><figure class="highlight powershell"><table><tr><td class="gutter"><pre><span class="line">1</span><br></pre></td><td class="code"><pre><span class="line">npm ci</span><br></pre></td></tr></table></figure><p>使用 <code>npm ci</code> 而非 <code>npm install</code> 是因为前者会严格根据仓库中的 <code>package-lock.json</code> 恢复依赖，适合在新电脑上还原已有项目。</p><h4 id="使用-hexo-s-在浏览器中输入-https-localhost-4000-能够正常显示主题和历史文章，就说明博客环境恢复成功。"><a href="#使用-hexo-s-在浏览器中输入-https-localhost-4000-能够正常显示主题和历史文章，就说明博客环境恢复成功。" class="headerlink" title="使用 hexo s ,在浏览器中输入 https://localhost:4000 能够正常显示主题和历史文章，就说明博客环境恢复成功。"></a>使用 <code>hexo s</code> ,在浏览器中输入 <code>https://localhost:4000</code> 能够正常显示主题和历史文章，就说明博客环境恢复成功。</h4><h3 id="2、在新电脑上写文章"><a href="#2、在新电脑上写文章" class="headerlink" title="2、在新电脑上写文章"></a>2、在新电脑上写文章</h3><p>创建文章： <code>npx hexo new &quot;文章标题&quot;</code>, 使用 <code>npx hexo generate &amp; npx hexo s</code> 在本地预览。</p><p>确认排版、链接和图片都正常后，上传文章并触发部署：</p><figure class="highlight powershell"><table><tr><td class="gutter"><pre><span class="line">1</span><br><span class="line">2</span><br><span class="line">3</span><br></pre></td><td class="code"><pre><span class="line">git add .</span><br><span class="line">git commit <span class="literal">-m</span> <span class="string">&quot;发布文章标题&quot;</span></span><br><span class="line">git push</span><br></pre></td></tr></table></figure><p>只要 Cloudflare Pages 仍然连接着这个 GitHub 仓库，推送到生产分支后就会自动构建和发布，不需要在新电脑上登录 Cloudflare 重新配置。</p><h3 id="3、多台电脑写作时的正确顺序"><a href="#3、多台电脑写作时的正确顺序" class="headerlink" title="3、多台电脑写作时的正确顺序"></a>3、多台电脑写作时的正确顺序</h3><p>如果旧电脑和新电脑都会使用，每次开始写作前先执行： <strong><code>git pull --rebase</code></strong>,写完后再执行：</p><figure class="highlight powershell"><table><tr><td class="gutter"><pre><span class="line">1</span><br><span class="line">2</span><br><span class="line">3</span><br></pre></td><td class="code"><pre><span class="line">git add .</span><br><span class="line">git commit <span class="literal">-m</span> <span class="string">&quot;发布文章标题&quot;</span></span><br><span class="line">git push</span><br></pre></td></tr></table></figure><p>简单来说，就是： <strong>开始写之前先<code>git pull</code>,写完之后再<code>git push</code></strong> 。否则，两台电脑同时修改同一篇文章，容易产生 Git 冲突。</p><h2 id="⚠️-八、常见问题排查"><a href="#⚠️-八、常见问题排查" class="headerlink" title="⚠️ 八、常见问题排查"></a>⚠️ 八、常见问题排查</h2><h3 id="仓库本地与远端的命名不匹配"><a href="#仓库本地与远端的命名不匹配" class="headerlink" title="仓库本地与远端的命名不匹配"></a>仓库本地与远端的命名不匹配</h3><blockquote><p>📷  <img src="https://img.didadi.xyz/file/1784632383775_%E4%BB%93%E5%BA%93%E6%9C%AA%E5%8C%B9%E9%85%8D.png" alt="分支名不匹配报错"></p></blockquote><p>使用命令将本地默认的 <code>master</code> 仓库分支名改为 <code>main</code></p><figure class="highlight powershell"><table><tr><td class="gutter"><pre><span class="line">1</span><br></pre></td><td class="code"><pre><span class="line">git branch <span class="literal">-M</span> main</span><br></pre></td></tr></table></figure><h3 id="关于命令格式的问题"><a href="#关于命令格式的问题" class="headerlink" title="关于命令格式的问题"></a>关于命令格式的问题</h3><p>通常来说，如果你使用 <code>npm install -g hexo-cli</code> 进行的全局中安装，那么<code>hexo</code>命令前面的<code>npx</code>可以省略，并且可以缩写。否则建议使用带<code>npx</code>的完整命令</p><table><thead><tr><th>功能</th><th><strong>npx完整命令（推荐）</strong></th><th><strong>hexo-cli（全局）</strong></th><th><strong>缩写（仅全局）</strong></th></tr></thead><tbody><tr><td>初始化博客</td><td><code>npx hexo init .</code></td><td><code>hexo init .</code></td><td>❌ 无缩写</td></tr><tr><td>安装依赖</td><td><code>npm install</code></td><td><code>npm install</code></td><td>❌ 无缩写</td></tr><tr><td>启动本地服务</td><td><code>npx hexo server</code></td><td><code>hexo server</code></td><td><code>hexo s</code></td></tr><tr><td>生成静态文件</td><td><code>npx hexo generate</code></td><td><code>hexo generate</code></td><td><code>hexo g</code></td></tr><tr><td>部署到远程</td><td><code>npx hexo deploy</code></td><td><code>hexo deploy</code></td><td><code>hexo d</code></td></tr><tr><td>清理缓存</td><td><code>npx hexo clean</code></td><td><code>hexo clean</code></td><td><code>hexo cl</code></td></tr><tr><td>新建文章</td><td><code>npx hexo new post &quot;title&quot;</code></td><td><code>hexo new post &quot;title&quot;</code></td><td><code>hexo n &quot;title&quot;</code></td></tr><tr><td>新建页面</td><td><code>npx hexo new page about</code></td><td><code>hexo new page about</code></td><td>❌ 无缩写</td></tr><tr><td>列出所有命令</td><td><code>npx hexo help</code></td><td><code>hexo help</code></td><td>❌ 无缩写</td></tr><tr><td>查看版本</td><td><code>npx hexo -v</code></td><td><code>hexo -v</code></td><td>❌ 无缩写</td></tr></tbody></table><h3 id="构建提示-npm-ci-或依赖错误"><a href="#构建提示-npm-ci-或依赖错误" class="headerlink" title="构建提示 npm ci 或依赖错误"></a>构建提示 <code>npm ci</code> 或依赖错误</h3><p>确认仓库中存在 <code>package.json</code> 和 <code>package-lock.json</code>。本地删除依赖后重新安装并构建，再提交锁文件。这里因为是Cloudflare在云端使用hexo框架来生成博客文章，所以构建命令一定是：</p><figure class="highlight powershell"><table><tr><td class="gutter"><pre><span class="line">1</span><br></pre></td><td class="code"><pre><span class="line">npx hexo generate</span><br></pre></td></tr></table></figure><p>而不能是</p><figure class="highlight powershell"><table><tr><td class="gutter"><pre><span class="line">1</span><br><span class="line">2</span><br><span class="line">3</span><br></pre></td><td class="code"><pre><span class="line">npm hexo generate</span><br><span class="line">或</span><br><span class="line">npm run build</span><br></pre></td></tr></table></figure><h3 id="node-js-和-git-安装成功，但查看版本报错"><a href="#node-js-和-git-安装成功，但查看版本报错" class="headerlink" title="node.js 和 git 安装成功，但查看版本报错"></a>node.js 和 git 安装成功，但查看版本报错</h3><p><img src="https://img.didadi.xyz/file/1784710023836_path-fault.png" alt="系统不识别命令"></p><p>这种情况可能是程序的路径还没有在系统变量中生效，一般可以退出命令窗口重新进入即可。</p><h3 id="部署成功但页面是-404"><a href="#部署成功但页面是-404" class="headerlink" title="部署成功但页面是 404"></a>部署成功但页面是 404</h3><p>优先确认<strong>输出目录是 <code>public</code></strong>，<strong>根目录</strong>没有误填子目录，并检查构建日志中是否真的生成了 <code>public/index.html</code>。</p><h3 id="CSS-或文章链接路径错误"><a href="#CSS-或文章链接路径错误" class="headerlink" title="CSS 或文章链接路径错误"></a>CSS 或文章链接路径错误</h3><p>独立域名修改<code>_config.yml</code>中的 <code>url: https://laomingong.com</code> 字段后运行：</p><figure class="highlight powershell"><table><tr><td class="gutter"><pre><span class="line">1</span><br><span class="line">2</span><br><span class="line">3</span><br></pre></td><td class="code"><pre><span class="line">npx hexo clean</span><br><span class="line">npx hexo generate</span><br><span class="line">npx hexo server</span><br></pre></td></tr></table></figure><h3 id="推送后没有触发部署"><a href="#推送后没有触发部署" class="headerlink" title="推送后没有触发部署"></a>推送后没有触发部署</h3><p>检查推送的是否为生产分支 <code>main</code>，再到 Cloudflare 的部署设置中核对仓库连接。必要时可在 Deployments 中手动重试失败的构建。</p><h2 id="🌟-九、这套方案适合谁"><a href="#🌟-九、这套方案适合谁" class="headerlink" title="🌟 九、这套方案适合谁"></a>🌟 九、这套方案适合谁</h2><p>本方案适合希望低成本起步、愿意使用 Git、又不想维护 Linux 服务器的人。它的限制也很明显：网站主要是静态内容，复杂后端功能需要额外服务；平台规则、构建额度和部署方式也不完全由自己控制。</p><p>如果你还在 Cloudflare Pages 与 GitHub Pages 之间犹豫，可以继续阅读《Hexo 托管选型：GitHub Pages 与 Cloudflare Pages 有什么区别》。如果以后需要更强的控制能力，再迁移到 VPS + Nginx 也不会浪费前面的内容和域名积累。</p>]]>
    </content>
    <id>https://laomingong.com/2026-hexo-github-cloudflarepages</id>
    <link href="https://laomingong.com/2026-hexo-github-cloudflarepages"/>
    <published>2026-07-23T11:58:07.933Z</published>
    <summary>面向新手的 Hexo 建站教程，包含本地预览、GitHub 私有仓库、Cloudflare Pages 自动构建、自定义域名和常见错误排查。</summary>
    <title>Hexo + GitHub + Cloudflare Pages 搭建个人网站/个人博客：从本地到云端自动部署</title>
    <updated>2026-07-23T11:58:07.933Z</updated>
  </entry>
</feed>